
The “linked list” in JavaScript or other programming languages like C, C++, and Python is considered the most useful and popular data structure. It has a linear structure and is mostly compared with Arrays, but both are different in various aspects. In a linked list, the elements are not forced to be placed at the specified index and they consume more space than arrays due to the presence of “pointers” which store data about the upcoming or next linked node.
Structure of a Linked List
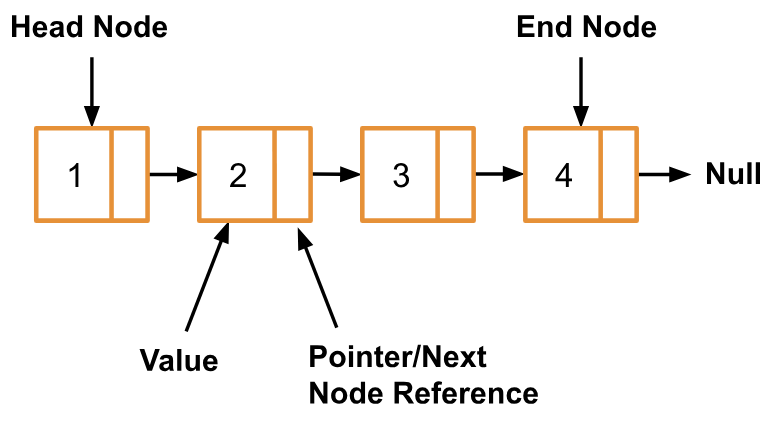
To insert a new node in the linked list at the front, start, beginning or end positions, the structure of the linked list needs to be understood. The Linked list consists of multiple nodes, each node is made up of two parts the “value” and “pointer”. The “pointer” contains the reference of the next node that is going to be linked and the pointer part is set to “null” for the last node in the linked list. The “value” part contains the value or content of a node.
The graphical representation of a dummy linked list and its components is shown below:
Now, let’s take a look at the below sections to insert a new node at the front/beginning or end of a linked list in JavaScript.
Insert a Node at the Front/Beginning of a Linked List?
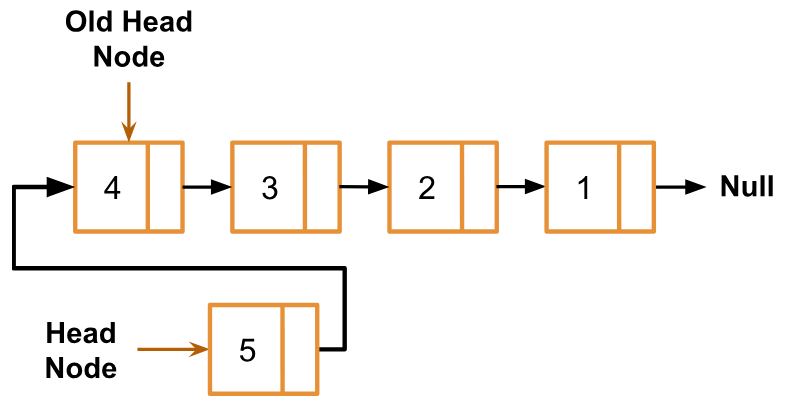
To insert a new node at the front, beginning, or start of the selected linked list, the linked list is first created, and a new node needs to be inserted. The pointer for a new node is then attached to the head node of the already created linked list. In this way, the linked list’s old header becomes the node, and new nodes will be considered as the new header of the linked list.
The visual representation of this process is illustrated below:
Now, visit the below JavaScript program that implements the discussed scenario to insert a node at the front or beginning of a linked list:
class linkedListNode {
  constructor(value) {
  this.value = value;
  this.next = null;
  }
}

function insertNodeAtFront(headIndex, newValue) {
  const newNode = new linkedListNode(newValue); //New Node Creation
  newNode.next = headIndex[0]; //Pointing to Old Head Node
  headIndex[0] = newNode; //Modifying the Old Head Node to New Node
}

  // Printing Linked List Content from head
function displayList(node) {
  let currentNode = node;
  while (currentNode !== null) {
  console.log(" " + currentNode.value);
  currentNode = currentNode.next;
  }
  console.log("\n");
}

function executor() {
  const LinkedList = [null]; // Set up List to Traverse
  // Inserting New Nodes at the Front
  insertNodeAtFront(LinkedList, 1);
  insertNodeAtFront(LinkedList, 2);
  insertNodeAtFront(LinkedList, 3);
  insertNodeAtFront(LinkedList, 4);
  insertNodeAtFront(LinkedList, 5);
  console.log("Linked List After Inserting Nodes at Beginning:");

  displayList(LinkedList[0]);
}

executor();
The above-stated code works like this:
- First, the class “linkedListNode” is created that receives the node value via constructor and stores it in the “value” variable and the “next” variable is set to “null”.
- Next, the function “insertNodeAtFront()” is created containing the parameters of “headIndex” and “newValue”. Create a new instance of the “linkedListNode” constructor, pass the “newValue” variable as the parameter, and store the result in the “newNode” variable.
- Set the “next” part of the “newnode” to the elements residing at the top or “0” index of the linked list, namely “headIndex”.
- After setting the pointer or creating a link with the linked list from the start, assign declare “newNode” at a new header.
- In order to display the linked list content, create a function named “displayList” accepting a single parameter of “node” that is assigned to the “currentNode” variable.
- Inside a function, utilize a while loop that iterates till the linked list or a “currentNode” variable becomes “null”. Inside it, display the values for both properties or parts of the node namely “value” and “next”.
- Finally, create an “executor()” function which acts as the main function and it contains an empty list named “LinkedList”.
- This “LinkedList” and the value for each node are passed as parameters for the “insertNodeAtFront()” function.
- Each passed value is going to be placed at the beginning or start of a linked list, so the node that is going to be inserted at the end will be considered the head of a linked list.
- In the end, pass this list “linkedList” from the first “0” index to the “displayList()” method and invoke the “executor()” function to start the execution cycle.
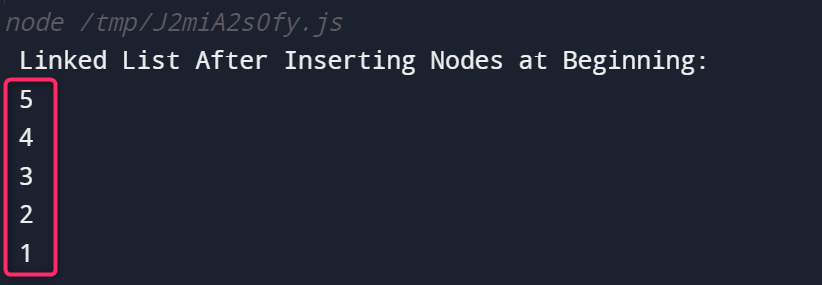
The output of the above-stated code shows that the node inserted at the end is inserted at the top, front, or beginning of the linked list due to its LIFO nature:
How to Insert a Node at the End of a Linked List?
The node can be inserted at the end or bottom of the linked list by assigning the pointer part of the last ending node with the newly created node. This new node now begins the part of an already created linked list and replaces the old new node with itself as a modified end node as its pointer part refers to “null”. The visual implementation of the discussed concept is shown below:
Let’s take a look over the practical implementation of inserting a node at the end of a linked list:
class linkedListNode {
constructor(value) {
  this.value = value;
  this.next = null;
}
}

function push(headIndex, newValue) {
const newNode = new linkedListNode(newValue); newNode.next = headIndex[0]; headIndex[0] = newNode;
}

function insertNodeAtEnd(headIndex, newValue) {
  const newNode = new linkedListNode(newValue);
  // Store the head reference in a last Node Temporary variable
  let lastNode = headIndex[0];
  newNode.next = null;  if (headIndex[0] === null) {
  headIndex[0] = newNode;
  return;
  }
  // Traverse Through The Linked List Till Last Node
while (lastNode.next !== null) {
  lastNode = lastNode.next;
} lastNode.next = newNode;
}
function displayList(LinkedList) {
  while (LinkedList !== null) {
  console.log(" " + LinkedList.value);
  LinkedList = LinkedList.next;
  }
}
function executor() {
  const LinkedList = [null];
  // Inserting Nodes in the LinkedList.
  push(LinkedList, 1);
  push(LinkedList, 2);
  push(LinkedList, 3);
  push(LinkedList, 4);
  console.log("Original Linked list:");
  displayList(LinkedList[0]);

  //Inserting New Node at the End
  insertNodeAtEnd(LinkedList, 6);
  console.log("\nLinked List After Inserting A New Node at the End:");
  displayList(LinkedList[0]);
}

executor();
The above-mentioned code works like this:
- First, the class “linkedListNode” is created that receives the node value via constructor and stores it in the “value” variable, and the “next” variable is set to “null”.
- Next, the function “push()” is created containing the parameters of “headIndex” and “newValue”.
- Create a new instance of the “linkedListNode” constructor having the parameter of the “newValue” variable, and store the result in the “newNode” variable.
- Link the new node “pointer” part with the header of a linked list and set the newly connected node as header.
- Then, define the “insertNodeAtEnd()” function having the same parameters of “headIndex” and “newValue”. Generate a new node and store it in the “newNode” variable.
- Store the head reference in the “newNode” variable and set its pointer “next” part to “null” because it is going to be placed at the end.
- Utilize the “if” statement to check if there is any node residing at the head position in the linked list or not to check the emptiness of the linked list.
- If the “if” statement returns false, utilize the “while” loop that traverses through the linked list until the node having pointer “next” is null. Once, the loop is terminated and now the end node has been selected. Its next part is then referred to as the newly created node.
- The nested “displayList()” function is then defined which displays the updated linked list content.
- Finally, create an “executor()” function which acts as the main function and it contains an empty list named “LinkedList”.
- This “LinkedList” and the value for each node are passed as parameters for the “push()” function. This list is then passed to the “displayList()” method to display the list content from the “0” index.
- After that, the new node is initialized and placed at the bottom of the linked list. By passing the “LinkedList” and node “value” as parameters for the “insertNodeAtEnd()” function and displaying the whole linked list again.
- In the end, invoke the “executor()” function to start the execution cycle.
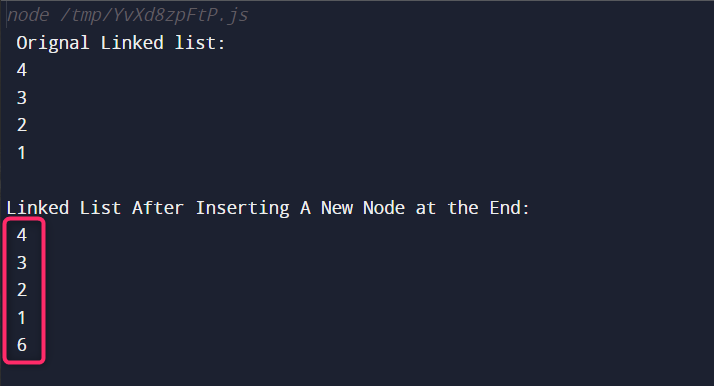
The output after executing the above code shows that a new node has been inserted at the end or bottom of the linked list:
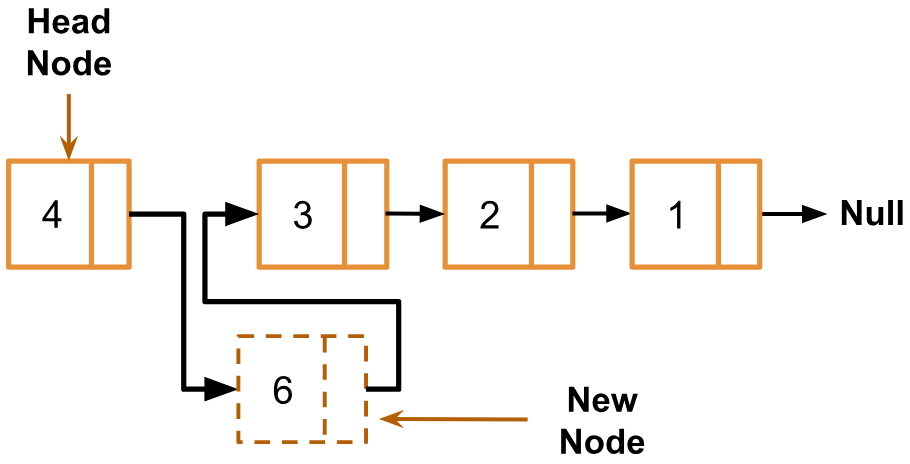
Bonus Tip: How to Insert a Node After Head Node in a Linked List?
To insert a new node after the head or beginning node, pass the newly created node as the reference for the head node pointer part. Then, assign the upcoming node as the reference for the already attached new node. To link the remaining linked list nodes. The discussed scenario to insert a node after a head node is graphically represented as:
Let’s take a look at the below-stated code to implement the discussed scenario in JavaScript:
class linkedListNode {
  constructor(value) {
  this.value = value;
  this.next = null;
  }
}

class LinkedList
{
  constructor()
  {
  this.headNode = null;
  }

  insertAfter(prevNode, newValue)
{
  if (!prevNode)
  {
  console.log("The given previous node cannot be NULL");
  return;
  }
  const newNode = new linkedListNode(newValue);
  newNode.next = prevNode.next;  prevNode.next = newNode;
}
push(newValue) {
  const new_node = new linkedListNode(newValue);
  new_node.next = this.headNode;
  this.headNode = new_node;
} displayList()
{
  let node = this.headNode;
  const tempList = [];
  while (node !== null) {
  tempList.push(node.value);
  node = node.next;
  }
  console.log(tempList.join(" "));
}
}
const provLinkedList = new LinkedList();

provLinkedList.push(1);
provLinkedList.push(2);
provLinkedList.push(3);
provLinkedList.push(4);

console.log("Provided Linked list is Shown Below:");
provLinkedList.displayList();

provLinkedList.insertAfter(provLinkedList.headNode, 6);

console.log("Linked List After Inserting Element Next to the Head Node:");
provLinkedList.displayList();
The description of the above code is as follows:
- First, create a “linkedListNode” class that takes the data “value” and “next” node reference about the single node of a linked list via its constructor.
- In order to place elements inside the linked list, create another class named “LinkedList” and set the value of “headNode” to “null” by default.
- Define a custom “insertAfter()” function which accepts two parameters of “prevNode” and “newValue”. In the function, the emptiness of a linked list is checked by identifying the value of a “prevNode” or head node via an “if” conditional statement.
- Then, the new node is created by inserting the provided “newValue” variable as a parameter for the “linkedListNode” class constructor. This node is then stored in a “newNode” variable.
- The “next” part is set to the “next” part of a previous node and the “next” part of the previous node “prevNode” is set to the newly created “newNode”.
- After that, define a “push()” function accepting node values “newValue” as parameters.
- Inside this function, the new node is created and placed at the top or beginning of the linked list, and the new node is identified as the new head node of a linked list.
- The function “displayList()” is also created that uses the “headNode” and temporary list “tempList” to traverse through the whole linked list. After traversing, the nodes residing in the linked list get displayed over the console.
- Finally, create a new instance of the “LinkedList” class named “provLinkedList” and apply the “push()” method with this instance to create and insert a new node in the linked list.
- Display the created linked list by applying the “displayList()” function with the created “provLinkedList” linked list.
- The head node “headNode” of this linked list and the new node that needs to be inserted after the linked list head node is passed to the “insertAfter()” function.
- For verification again display the linked list via the “displayList()” method.
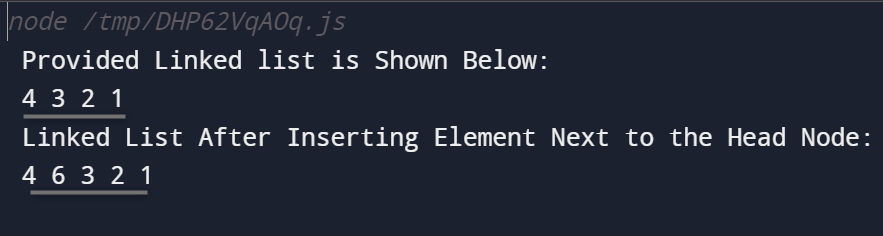
The output generated by the above code shows that the new node is been inserted at the desired position in the linked list:
That’s all about inserting a node at the front or end of a linked list.
Conclusion
To insert a node at the front, start, or beginning of a linked list, the linked list’s existence must be checked. Then, set the head node as a reference for the new node pointer part and declare the new node as the linked list head node. In the case of inserting at the end position, the new node reference is passed to the end node pointer part. This links the new node with the linked list from the end or bottom place without changing the rest of the linked list nodes. This guide has explained the procedure to insert a node at the front/beginning or end of a linked list.
Frequently Asked Questions
How to insert a node at the beginning of a linked list in JavaScript?
To insert a node at the beginning of a linked list in JavaScript, create a new node, set its pointer to the current head node, and update the head to point to the new node.
What is the structure of a linked list in programming languages like C, C++, and Python?
A linked list consists of nodes, each containing a value and a pointer. The pointer references the next node in the list, and the last node's pointer is set to null.
How is a linked list different from an array in terms of memory consumption?
Linked lists consume more space than arrays due to the presence of pointers that store information about the next linked node, while arrays store elements in contiguous memory locations.
Why are linked lists considered a popular data structure in JavaScript?
Linked lists are popular in JavaScript due to their dynamic nature, allowing for efficient insertion and deletion of elements without the need to shift other elements like in arrays.
What is the importance of pointers in a linked list?
Pointers in a linked list store references to the next node, enabling the traversal of the list and the creation of dynamic data structures with varying sizes.
How to visualize the structure of a linked list using graphical representations?
Graphical representations of a linked list typically show nodes with values and pointers connecting them, illustrating the sequential nature of the linked data structure.
What happens when a new node is inserted at the end of a linked list?
When a new node is inserted at the end of a linked list, its pointer is set to null, indicating that it is the last node in the list, and the previous last node's pointer is updated to point to the new node.
How does inserting a node at the front of a linked list affect the existing nodes?
Inserting a node at the front of a linked list shifts the existing nodes down the list, with the newly inserted node becoming the first element and connecting to the previous first node.