
In PyTorch, the “torchvision.transforms” module has a collection of classes and functions to apply different transformations on desired images including rotating, cropping, resizing, and many more. It provides the “RandomResizedCrop()” method to crop a random area of a particular image and resize it to a specific size. Users are required to define the specific crop size i.e. image’s height and width. By using this method, the randomly cropped image of the defined size will be generated.
This article will demonstrate the method to crop a random area of an image and resize it to a specific size in PyTorch.
How to Crop a Random Area of Image and Resize it in PyTorch?
To crop a random area of an image and resize it to a specific size in PyTorch, try out the below-provided steps:
- Upload/add an image to Google Colab
- Install necessary libraries
- Read uploaded input image
- Define a transform for cropping a random area of the image and resizing it
- Apply transform on uploaded image
- Print randomly cropped and resized image
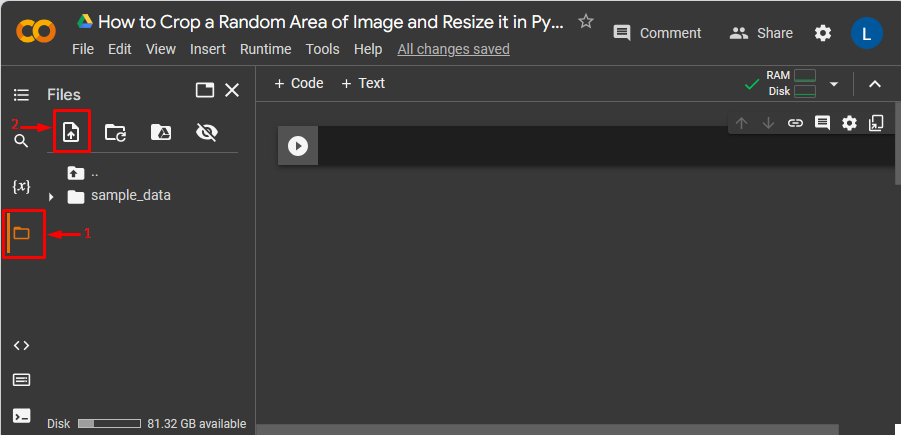
Step 1: Upload/Add an Image to Google Colab
First, add the desired image to the notebook by tapping on the below-highlighted icons:
This has added the image to Google Colab:
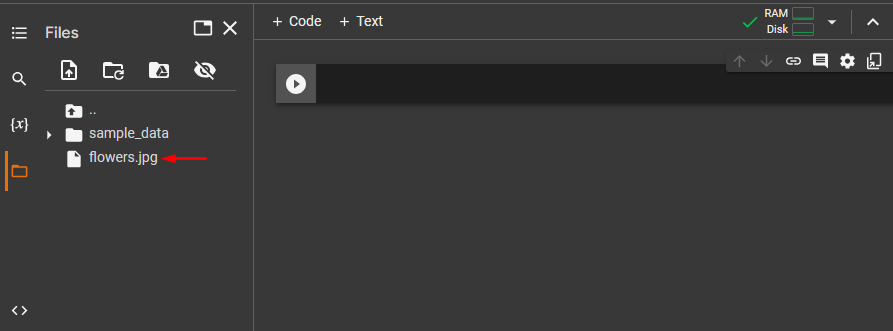
Below is the image that we have added to crop a random area of it and resize it:

Step 2: Install Necessary Libraries
Next, install the following libraries that are necessary for applying operations on images:
import torch, torchvision.transforms as transforms
from PIL import Image
In the above snippet:
- “import torch” imports PyTorch package.
- “import torchvision.transforms as transforms” imports the “transforms” module as a “transforms” for preprocessing image data.
- “from PIL import Image” imports “Image” from “PIL” for opening and saving various image file formats:

Step 3: Read the Uploaded Input Image
Then, utilize the “Image.open()” function to read the uploaded image i.e. “flowers.jpg” from the computer:
input_img = Image.open('flowers.jpg')
Step 4: Define a Transform
After that, define a transform through the “RandomResizedCrop()” method to crop the random area of the above input image and resize it to a specific size. For the random square crop, we need to define one value and two values can be defined for the random rectangle crop. Here, we have specified two values of height and width i.e. “200, 300” for the random rectangle crop:
transform = transforms.RandomResizedCrop(size=(200, 300))
Step 5: Apply Transform on the Uploaded Image
Now, apply defined transform on the uploaded input image to crop its random area and resize it:
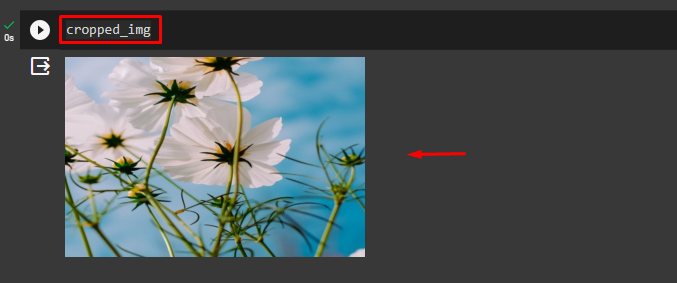
cropped_img = transform(input_img)Step 6: Display Cropped and Resized Image
Finally, print the cropped and resized image:
cropped_imgThe below output shows the randomly cropped and resized image:
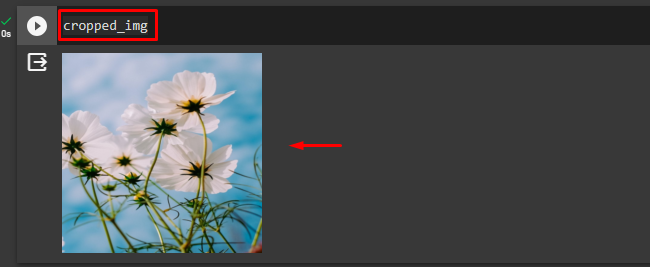
Likewise, users can define one value in the “RandomResizedCrop()” method to crop the random area of the image in a square shape. Moreover, the “scale” and “ratio” parameters can also be utilized to specify the upper and lower bounds for the random area and aspect ratio respectively:
transform = transforms.RandomResizedCrop(size=(200), scale=(0.2, 0.7), ratio=(0.5, 1.2))
This has cropped the random area of the image in a square shape:
Comparison
In the below table, the comparison between the original image and randomly cropped and resized images can be observed:


We have explained the method of cropping a random area of an image and resizing it in PyTorch.
Note: Click on the provided link to access our Google Colab Notebook.
Conclusion
To crop a random area of an image and resize it to a specific size in PyTorch, first, add the desired image to Google Colab. Then, install the required libraries and read the uploaded input image. After that, utilize the “RandomResizedCrop()” method to crop the random area of the input image and resize it. Finally, display the cropped and resized image. This article has demonstrated the method to crop a random area of an image and resize it to a specific size in PyTorch.
Frequently Asked Questions
How to crop a random area of an image using torchvision.transforms in PyTorch?
To crop a random area of an image in PyTorch, utilize the 'RandomResizedCrop()' method provided by the 'torchvision.transforms' module and specify the desired crop size.
What is the purpose of resizing a randomly cropped image in PyTorch?
Resizing a randomly cropped image in PyTorch allows you to standardize the dimensions of the cropped area to a specific size for further processing or analysis.
Can you define the steps to upload an image to Google Colab for cropping in PyTorch?
To upload an image to Google Colab for cropping in PyTorch, follow the steps provided in the article, which involve adding the image to the notebook using the highlighted icons.
Why is it important to install necessary libraries before cropping and resizing images in PyTorch?
Installing essential libraries like torch, torchvision.transforms, and PIL in PyTorch is crucial as they provide the required functions and classes for image processing tasks such as cropping and resizing.
How can I apply a transform to crop and resize an uploaded image in PyTorch?
To crop and resize an uploaded image in PyTorch, define a transform using 'transforms.Compose()' with 'RandomResizedCrop()' method and apply it to the image using 'transform(image)' function.
What does the 'Image.open()' function do in PyTorch image processing?
The 'Image.open()' function in PyTorch is used to open an image file and load it into memory for further manipulation or processing tasks.
Are there any specific requirements for defining the crop size in PyTorch image processing?
In PyTorch image processing, users need to specify the height and width of the desired crop size when using the 'RandomResizedCrop()' method to ensure accurate cropping and resizing of the image.
How can I print the randomly cropped and resized image in PyTorch after applying transformations?
To view the randomly cropped and resized image in PyTorch, simply print or display the transformed image using appropriate functions or visualization tools available in PyTorch.