
An email is a very handy communication tool that plays a significant role in contacting friends, requesting pieces of information, applying for jobs, and much more depending on the requirements. However, if this tool is not used efficiently then it can be a source of frustration, misunderstanding, or confusion such as sending an email with errors like typos mistake, incorrect information, and sharing sensitive content with the wrong person can cause misunderstanding.
If any of the above cases occurs, then fortunately it can be easily handled with the Outlook “Recall” feature. This feature allows the users to recall the sent email before its opening. This post will discuss how to recall an email in Outlook.
Let us start with the basics of the Outlook Recall feature.
What is the Recall of an Email in Outlook?
The “Recalling” feature of Outlook allows users to recall an email before the recipient reads or opens it. This feature deletes the sent email from the recipient’s inbox if it is not read. It is mostly used in the conditions if an email is sent with mistakes, incomplete information, without attaching the files, and many others.
What are the Limitations to Recall an Email in Outlook?
Recalling an email in Outlook only works on a few terms and conditions that are listed below:
- Outlook versions: The “Recall” feature is only available in Outlook 2007, 2010, 2013, 2016, 2019, 2021, and Outlook 365 versions.
- Office 365 or Microsoft Exchange account: The “Recall” feature only works if both the sender and the recipient is an Office 365 user or has a Microsoft Exchange account. If any of the above parties, use the other email service then this feature will not work.
- The message Should be Unread: The “Recall” feature only recalls the sent email that is in the recipient’s inbox and should be unread. If the recipient opens it or moves it into any other folder, then it cannot be recalled.
- Azure Information Protection: The “Recall” feature does not recall the email protected by “Azure Information Protection(AIP)”. This security protection allows the organization to protect the email by applying labels.
- Operating System Compatibility: The “Recall” feature exclusively works on the Windows operating system via web or desktop versions. However, it is not designed for macOS, iPhone, and Android devices.
How To Recall An Email In Outlook?
As discussed in the above section, the Outlook “Recall” feature is only designed for Windows operating systems. On Windows, It can be used in the following ways:
- Method 1: Recall An Email In Outlook Using “outlook.com”
- Method 2: Recall An Email In Outlook Using Outlook Desktop Application
This section comprises the practical implementation of both the above-stated methods.
Let us first start with the “outlook.com” method.
Method 1: Recall An Email In Outlook Using “outlook.com”
Microsoft 365 allows users to access and use its different applications online to perform the desired task without their installation. This technique is useful if the required features are available if not then install the targeted application and then perform the desired operation on it.
In this scenario, Outlook is accessed and utilized through its official website to recall an email by following the given steps of instructions.
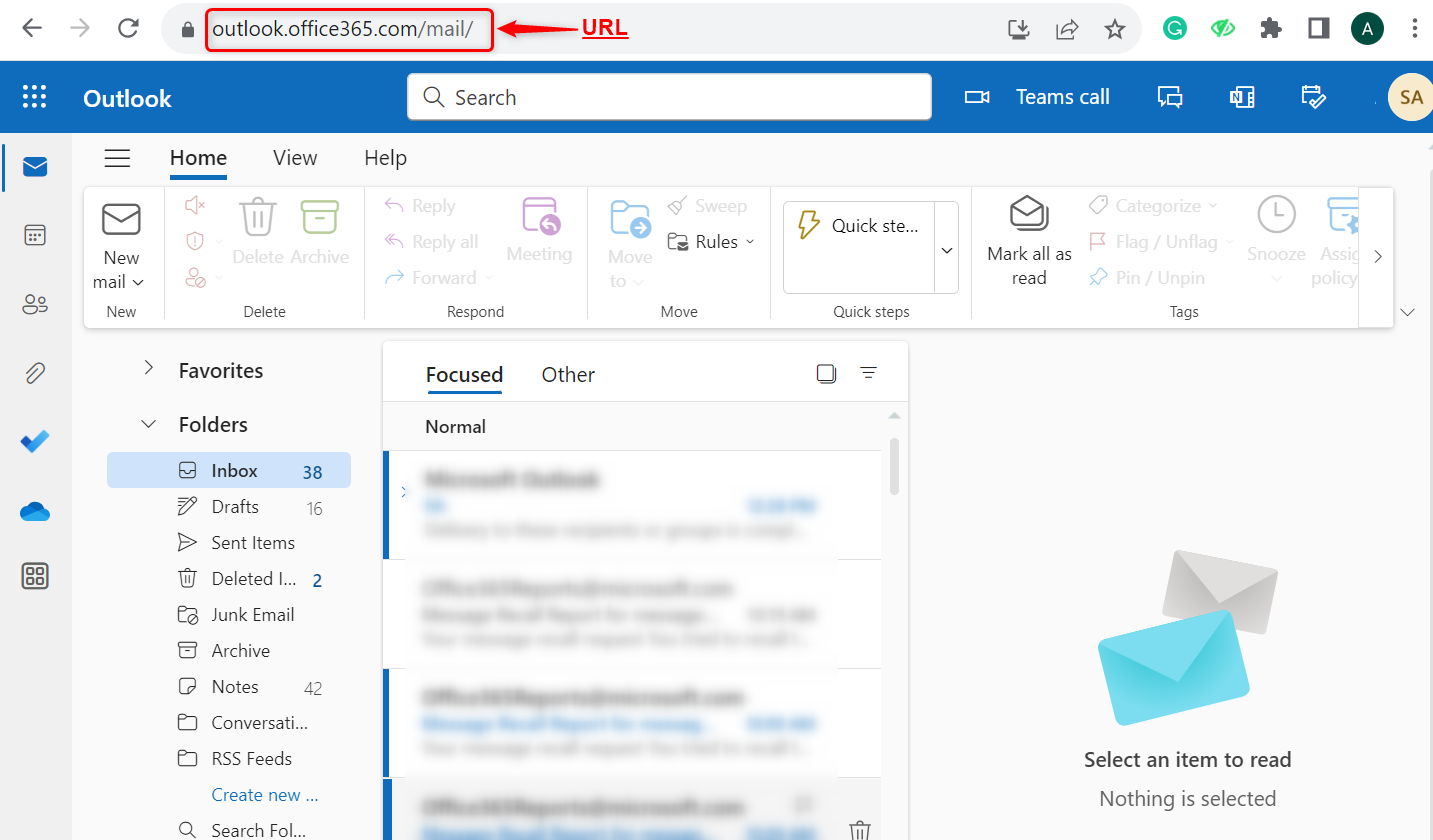
Step 1: Sign in to Outlook
First, visit the official website of Outlook, enter the “email” and “password” of your account, and click on the “Sign in” button. Once all is done successfully, the following interface of Outlook will be opened:
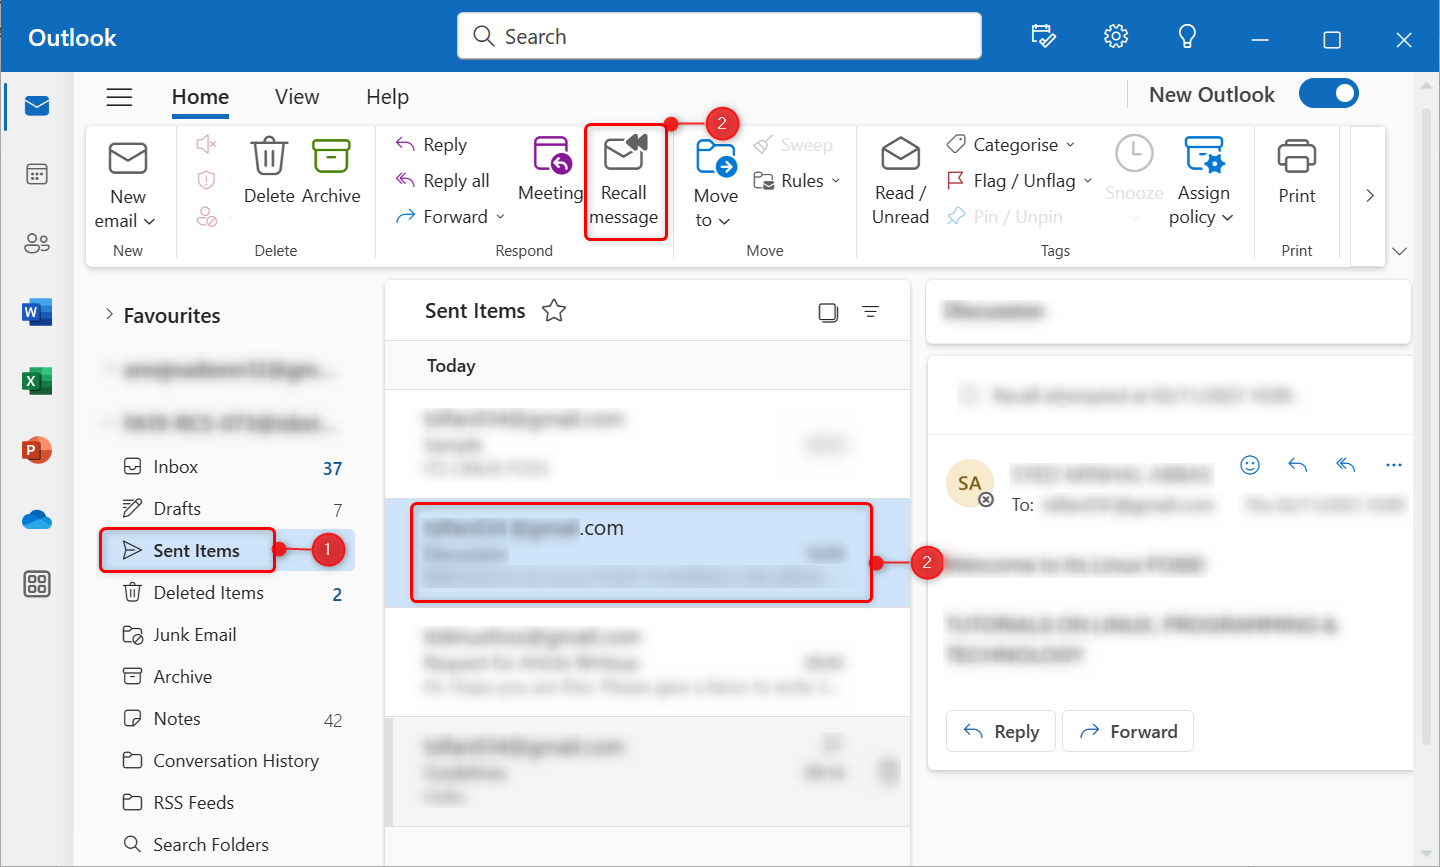
Step 2: Navigate to Send Items
Next, move on to the “Sent Items” folder that contains all the sent emails and select the targeted email that the user wants to recall:
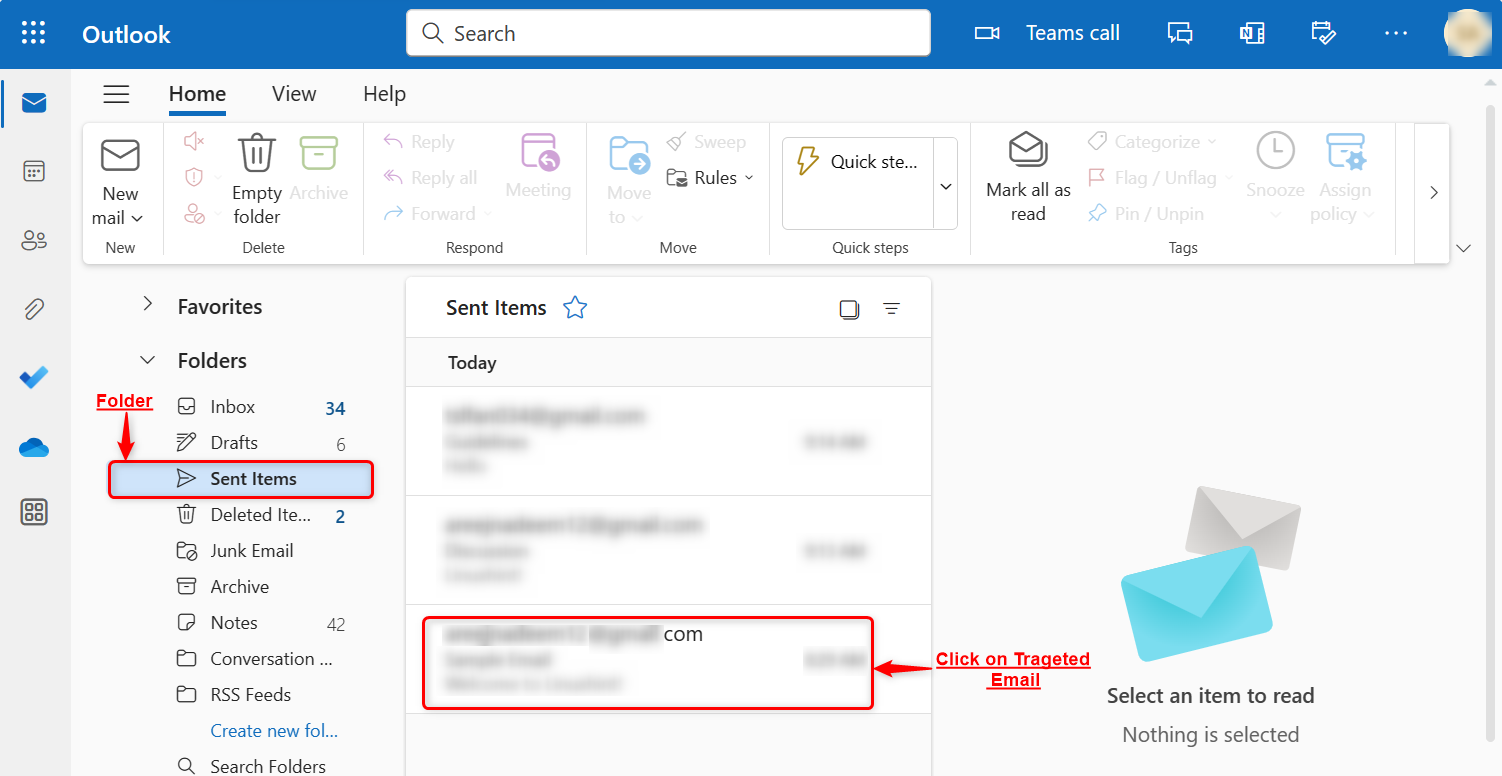
Step 3: Recall an Email
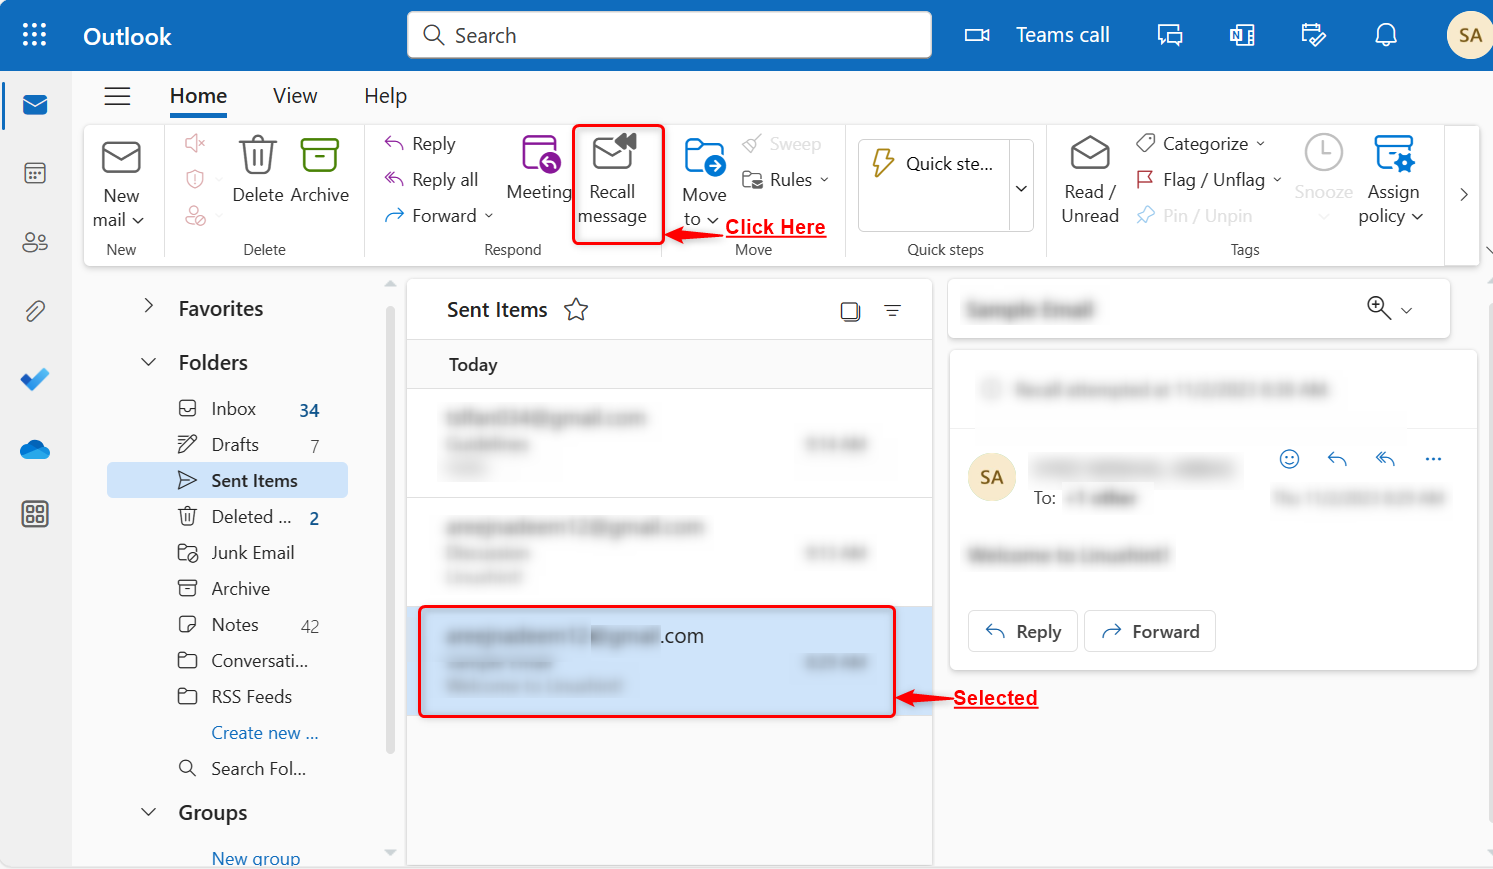
Now, click on the “Recall message” option from the “Home” menu to recall the content of that selected email:
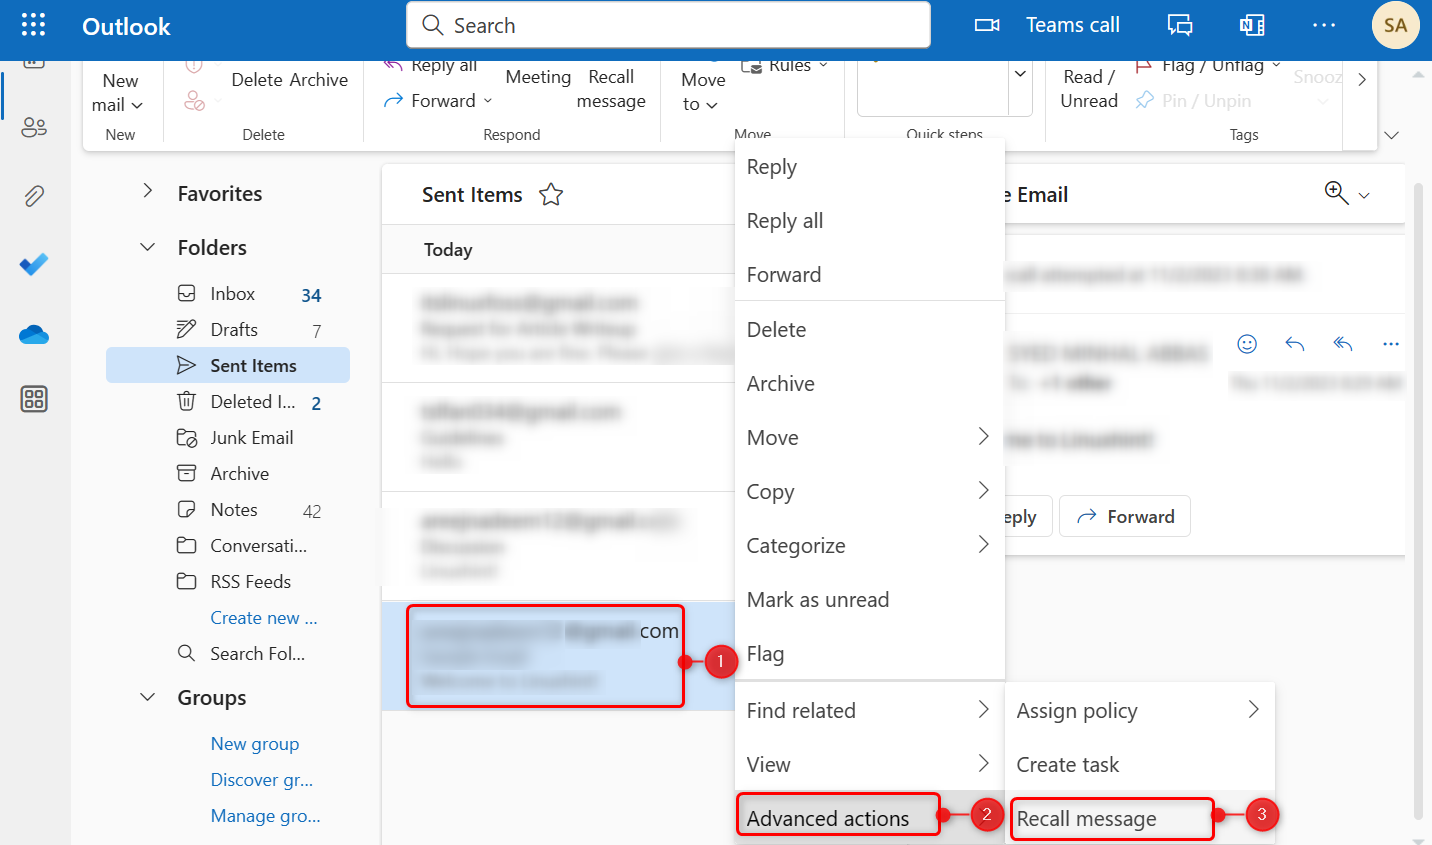
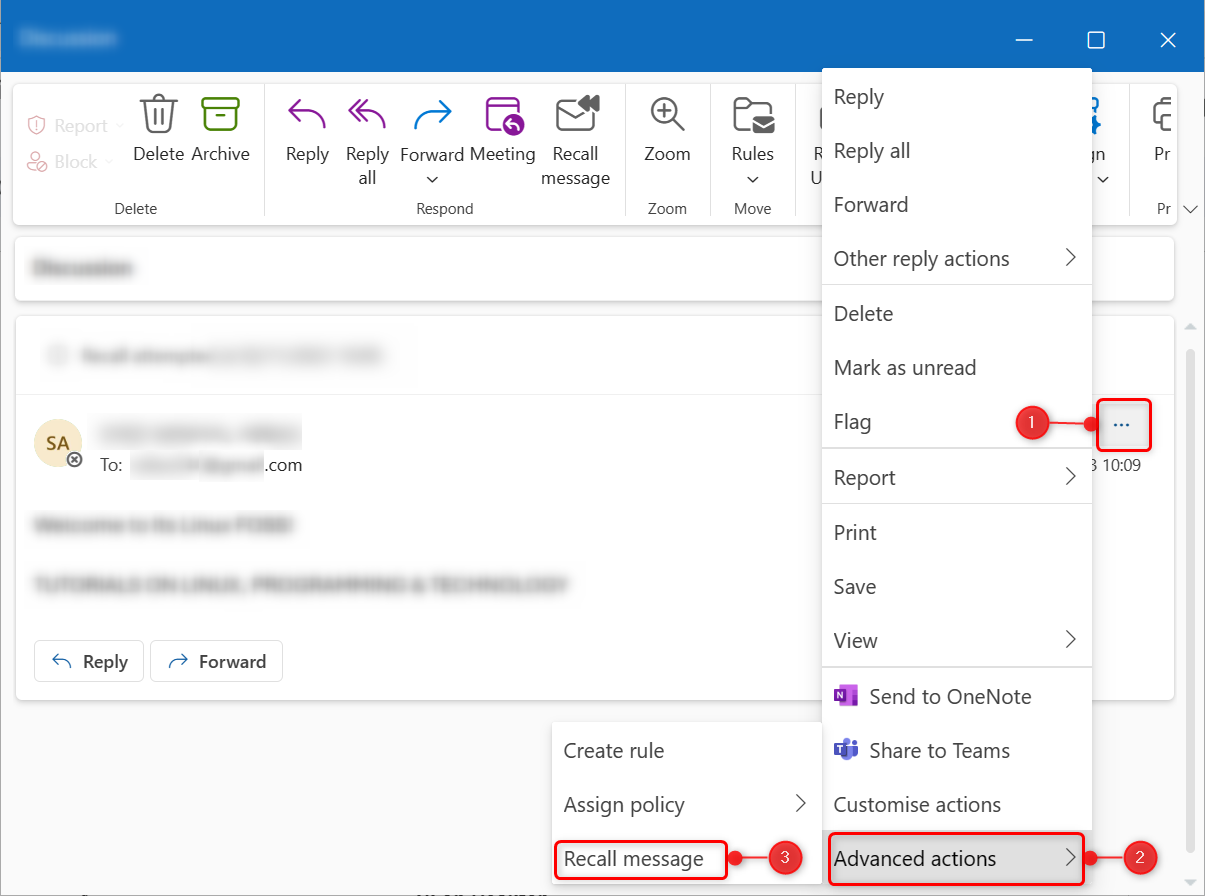
Other Way to Access the “Recall message” Option
The “Recall message” option can also be accessed with the help of the drop-down menu of the selected email. To do so, right-click on the selected email, move on to the “Advanced actions”, and then click on the “Recall message” option:
Another way is to open the selected email, click on the “Meatballs” menu, and select the “Recall message” option from the “Advanced actions” sub-menu:
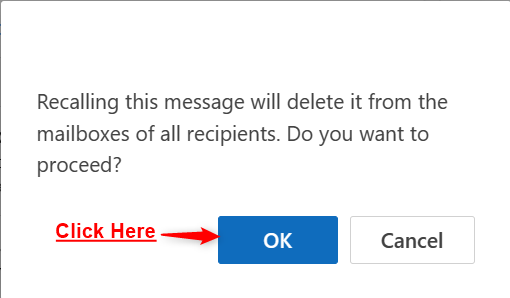
Step 4: Confirmation to Recall Targeted Email
Upon pressing the “Recall message” option, the following dialogue box will pop up. It says that the recalling of the message will delete the targeted email from all the recipient mailboxes. Click on the “OK” button to continue this process:
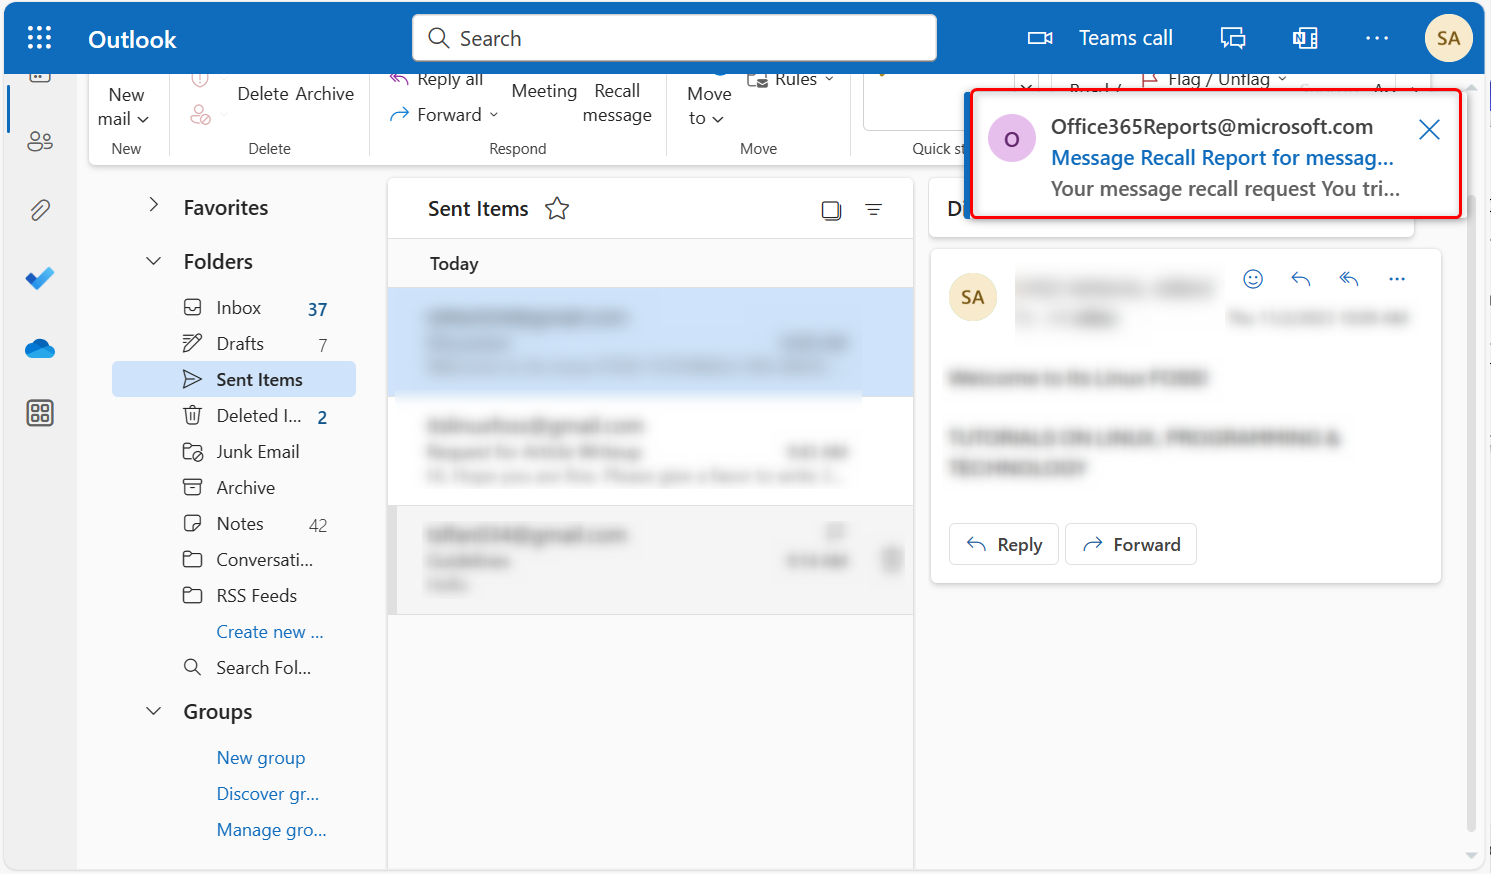
Once it is done, a verification email will received from [email protected] that shows the report of recalling the selected message:
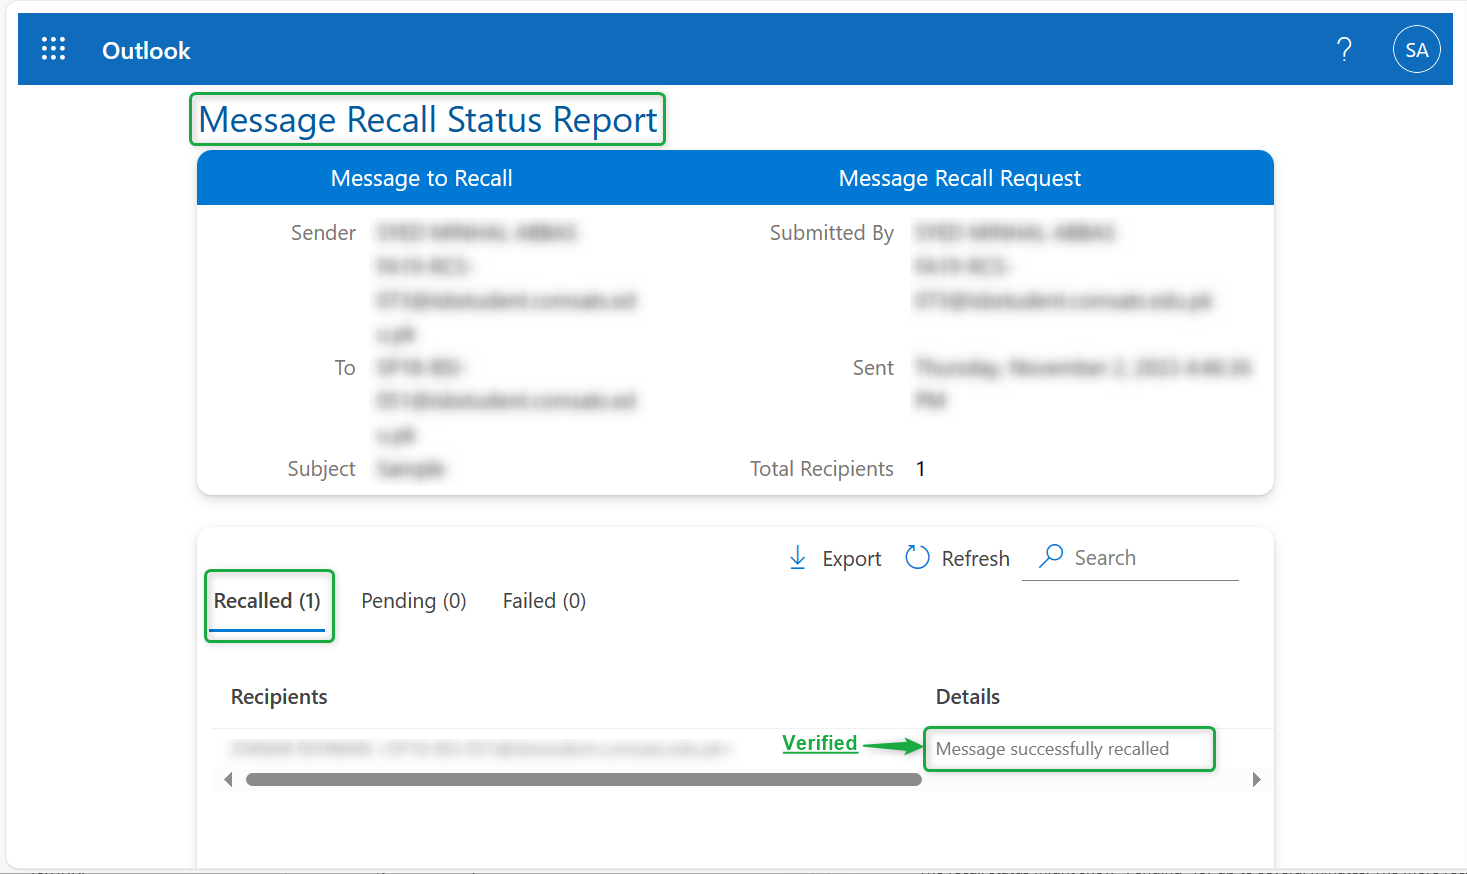
Step 5: Verification of Recalled Email
Lastly, open the report of the recalled message that verifies the specified message of the sent email has been successfully recalled and has automatically deleted from the recipient’s mailbox:
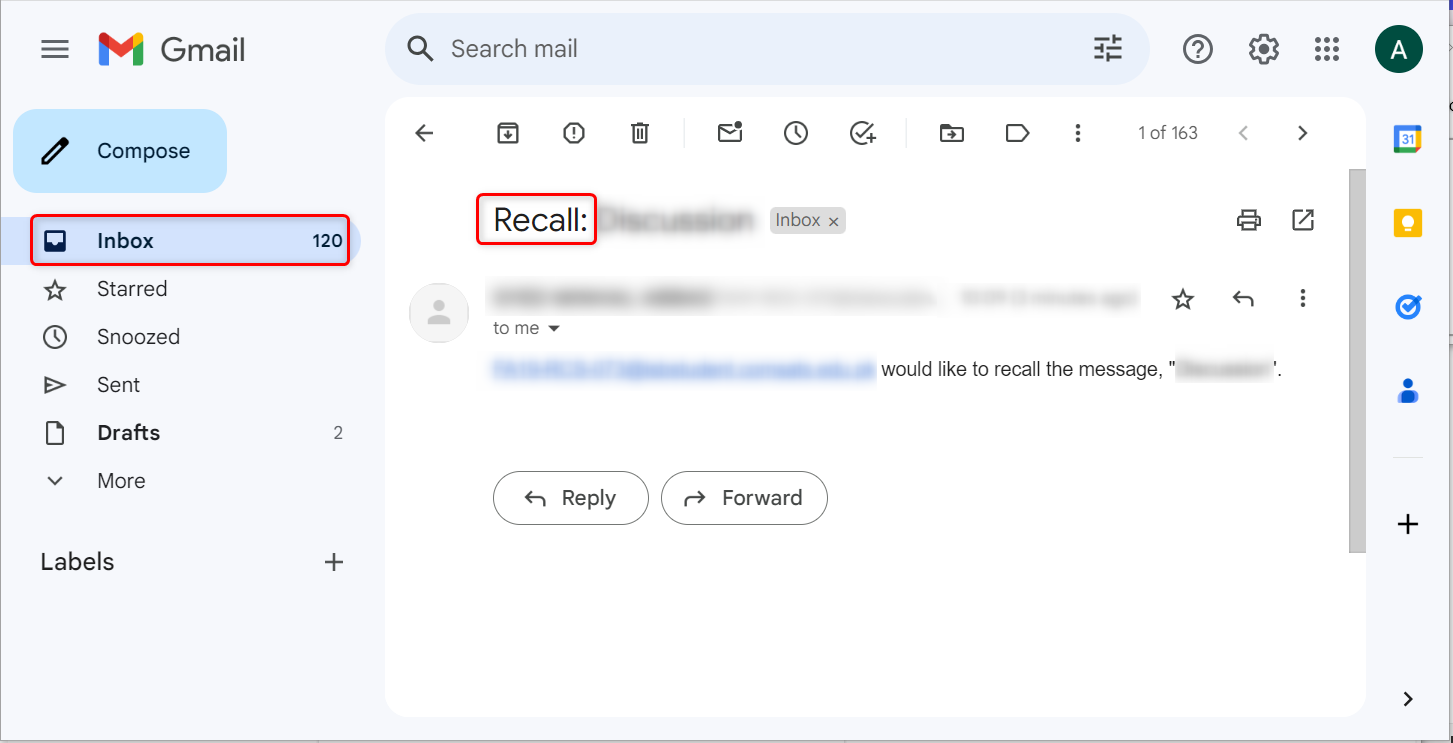
Recall an Email In Outlook If it is sent to a Gmail Account
If an email is sent to the recipient’s Gmail account, then it cannot be recalled or deleted from the recipient mailbox. However, only a notification email will send to the recipient that informs, the sender would like to recall the message of the specified subject:
Method 2: Recall An Email In Outlook Using Outlook Desktop Application
The recalling of a particular email in Outlook using the desktop version follows the same steps of instructions as performed for the “outlook.com”. For using the desktop version, the Outlook app should be installed in the user’s operating system.
Step 1: Open the Outlook Application
To access the installed Outlook app on the desktop, type “outlook” in the search bar and open the installed “Outlook” application:

Step 2: Recall an Email via Outlook Application
When the Outlook app is opened, navigate to the “Sent Items” folder, select the targeted email, and click on the “Recall message” from the “Home” menu to recall that email:
After pressing the “Recall message” option for the same steps need to be followed as performed in the above “outllok.com” section. Moreover, all the ways to access the “Recall message” option are also the same as in “outlook.com”.
Alternative to Recall an Email in Outlook
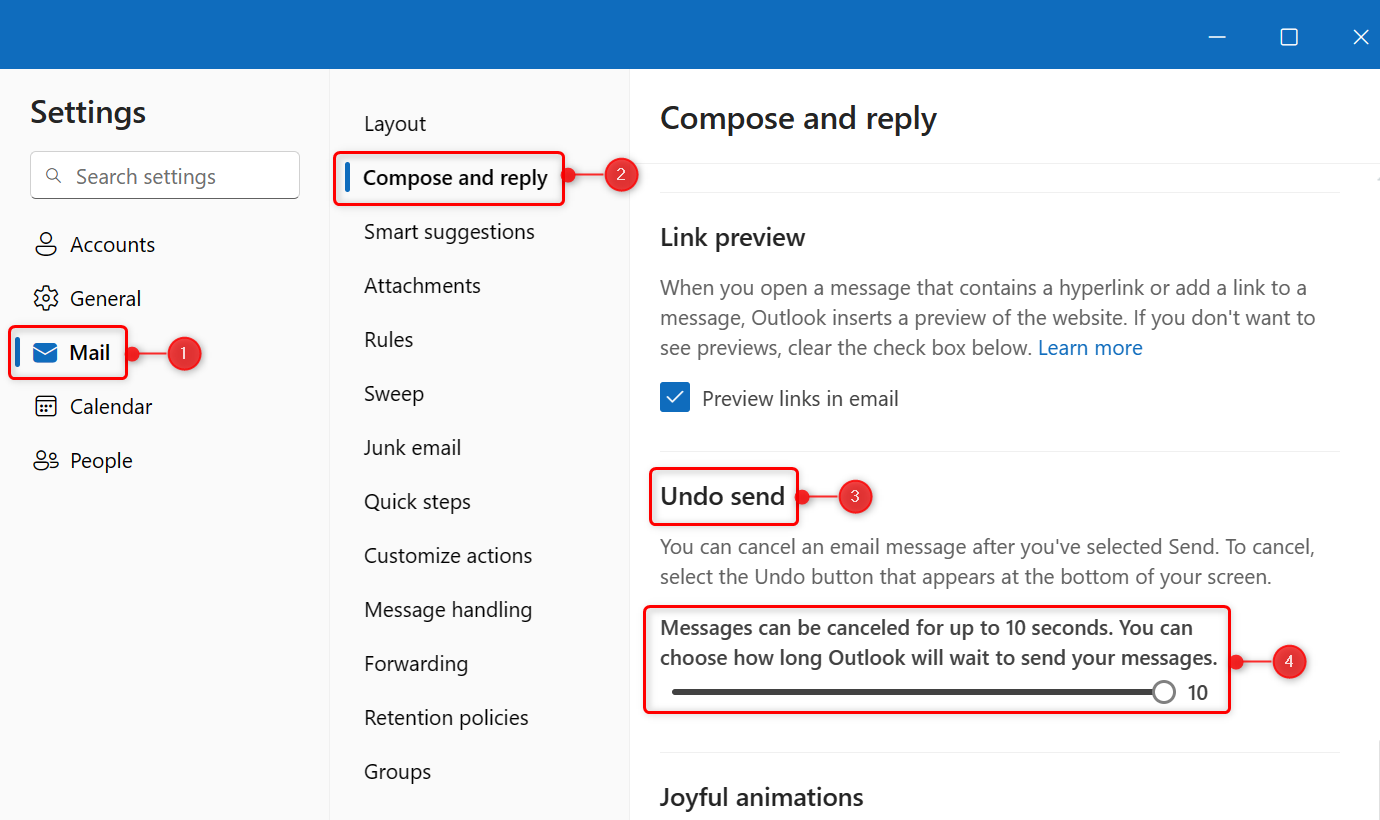
Same as other email applications, Outlook also provides the “Undo” feature. It helps to put back an email within the defined time interval if something goes wrong with it. By default, the time interval of the Outlook “Undo” send feature is “5 seconds”. However, the user can change it up to a maximum of “10” seconds manually. To do so, follow the below steps of instructions.
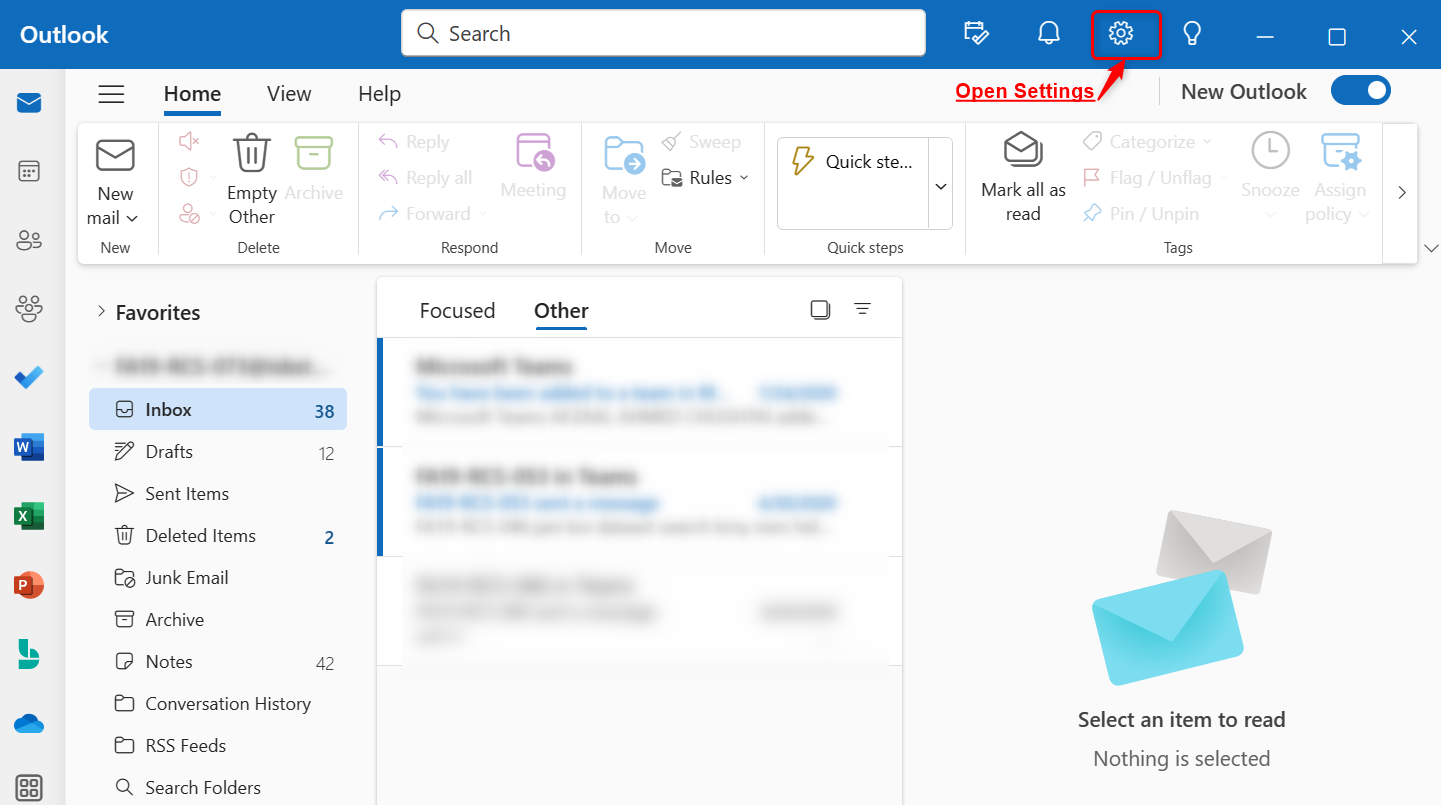
Step 1: Open the Outlook App Settings
First, open the Outlook “settings” by clicking on its icon present in the “Quick Access Toolbar” :
Step 2: Change Undo Send Time Limit
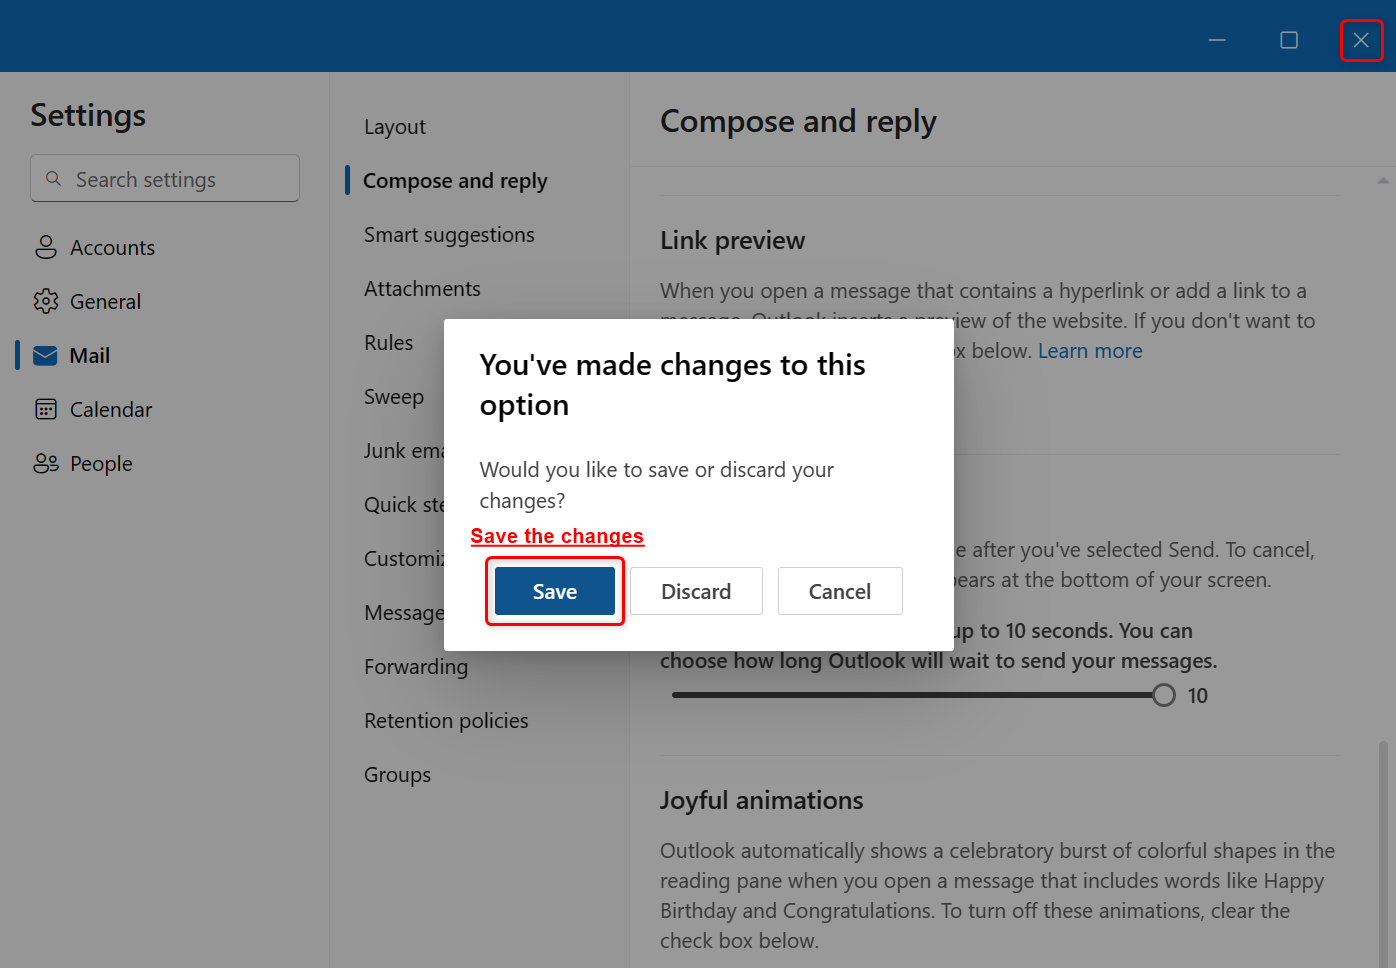
Next, open the “Mail” section from the navigation pane, click on the “Compose and reply” option from “Layout”, and then increase the time limit of the “Undo Send” feature. In this scenario, it is set to its max value which is “10 seconds”:
Once all is done, then “Save” the new changes:
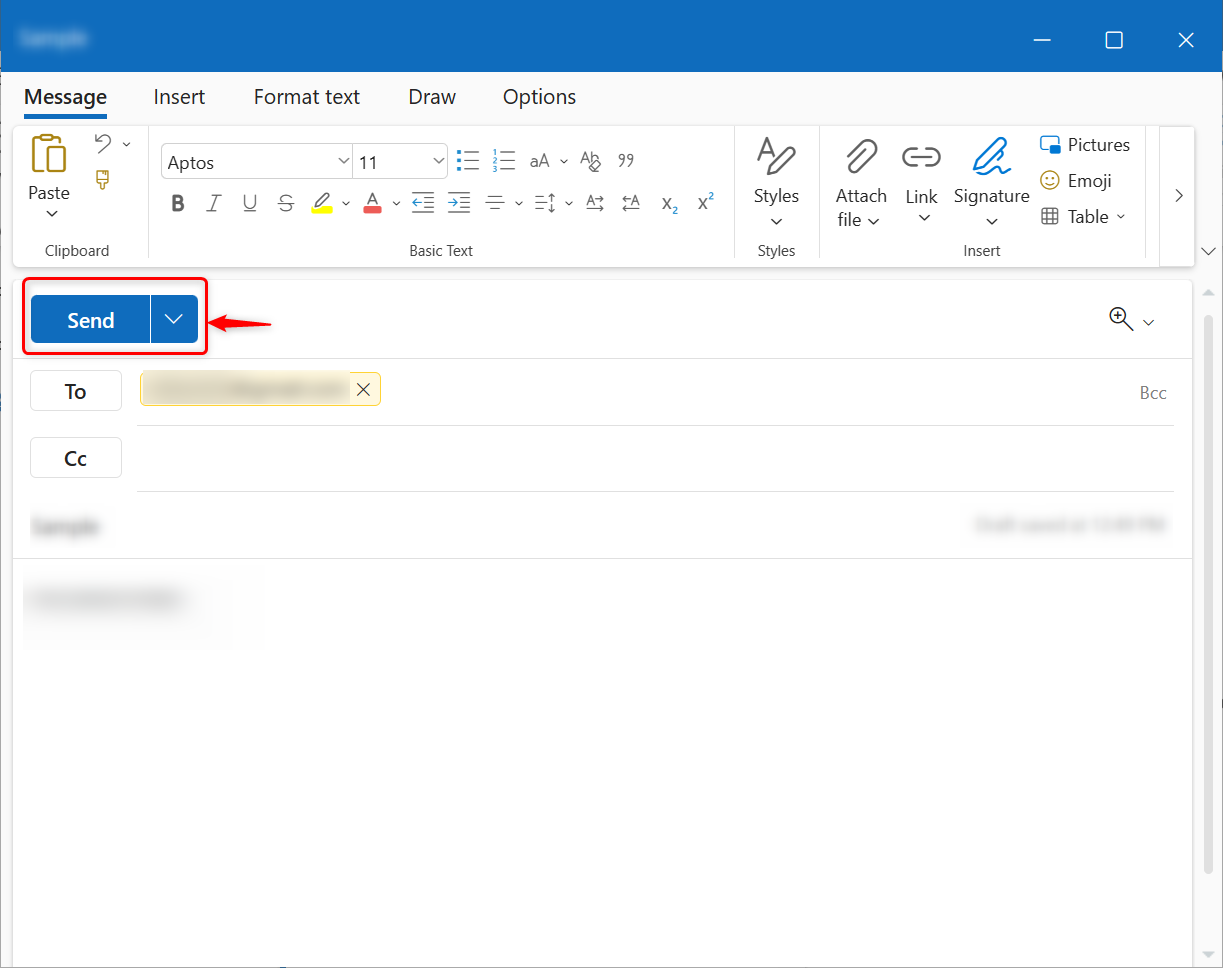
Now for verification compose an email by utilizing the “New Email” option and “Send” it:
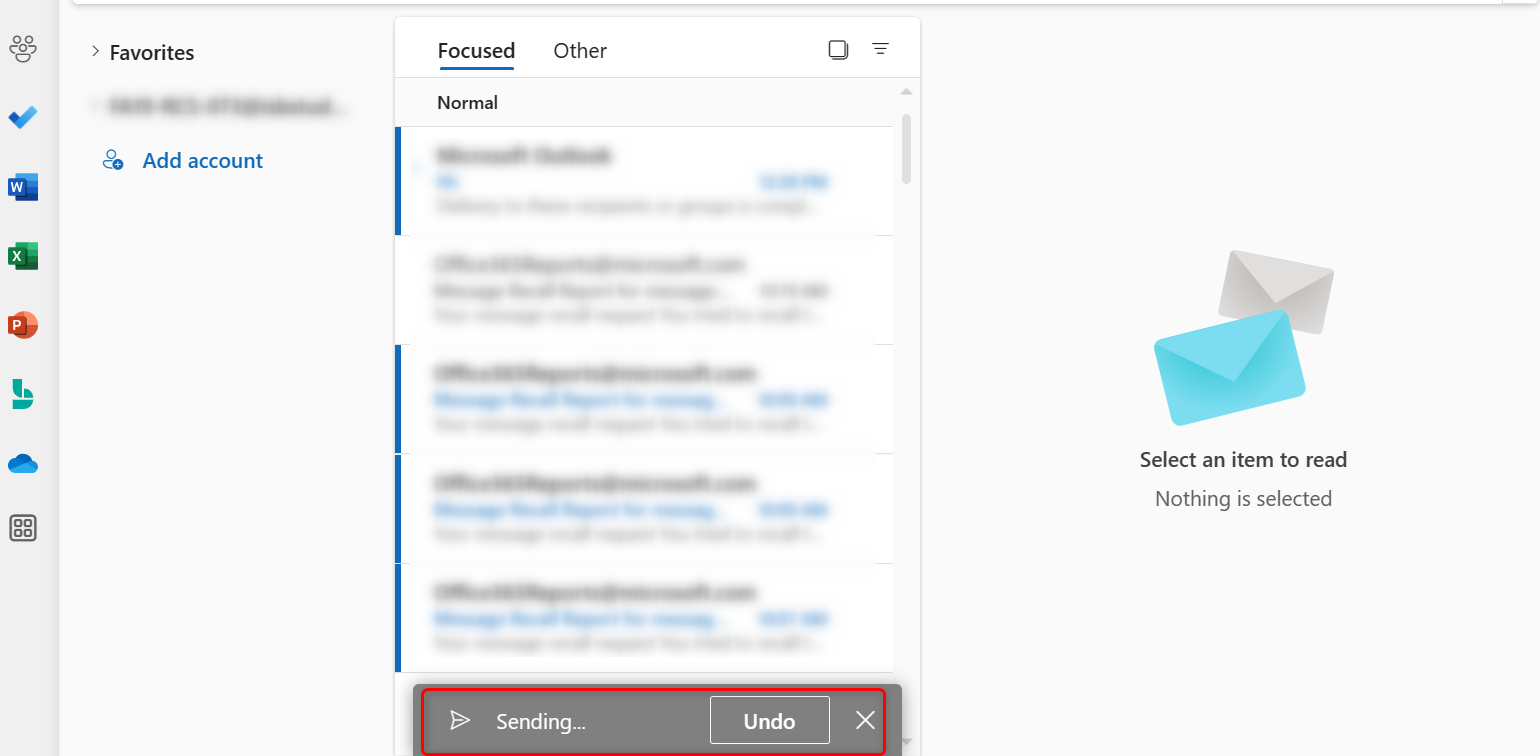
After pressing the “Send” option the “Undo” feature pops up for the specified time interval to recall an email. Click on it:
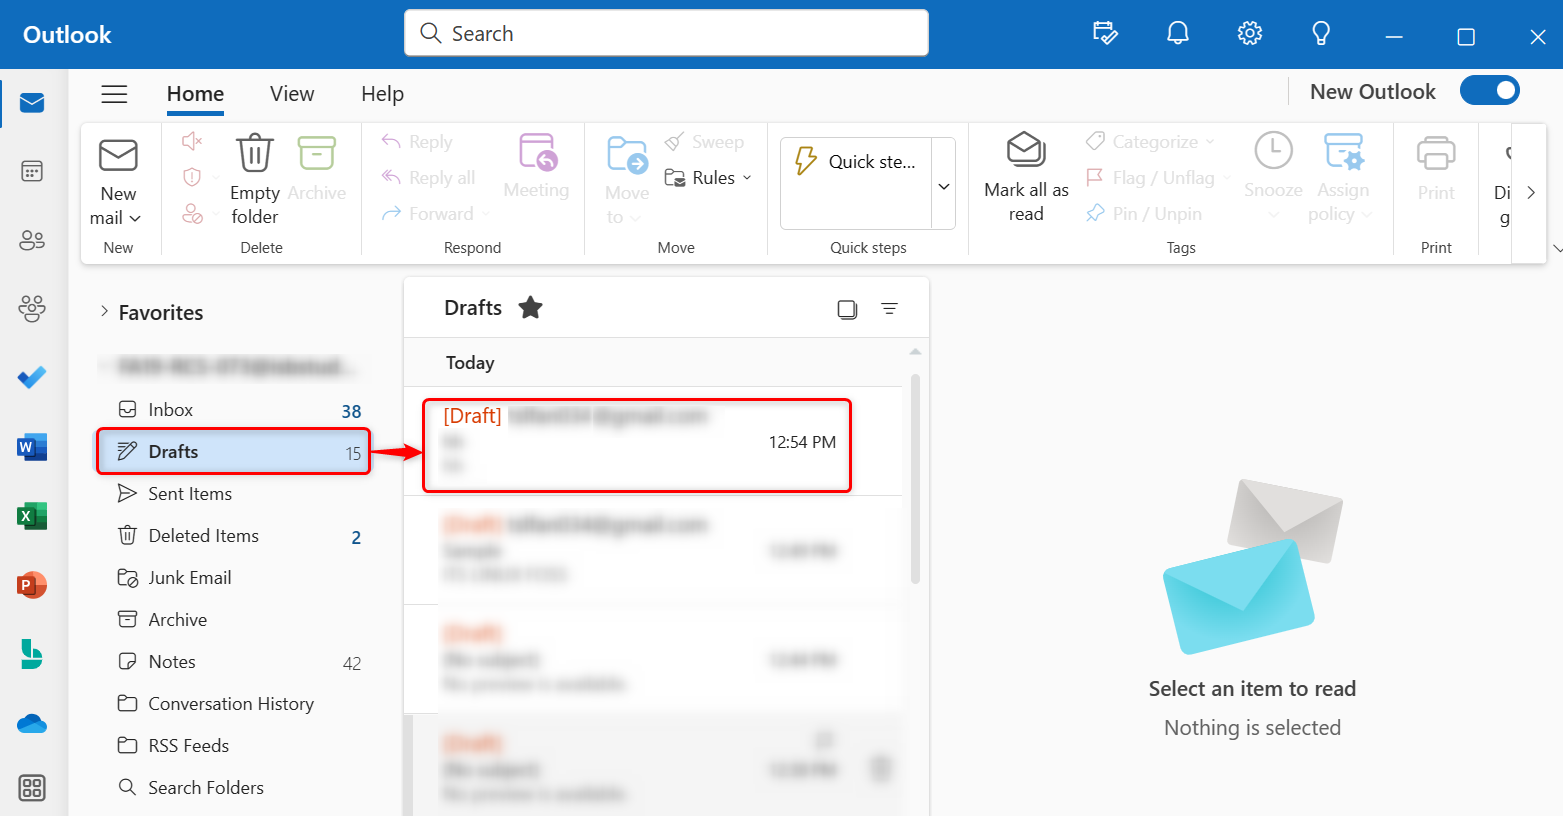
It can be analysed that the specified email is not sent and recalled back into the “Draft” folder of Outlook. Now customize it according to the requirements and send it again:
That is all about recalling an email in Outlook.
Conclusion
To recall an email in Outlook, first navigate to the “Sent Items” folder and select the targeted email that the user wants to recall. Next, click on the “Recall message” option that comes in the “Home” menu after the selection of an email. After that, the “Recall message” sends a verification email immediately to the sender’s inbox that contains the successful or failed status of the recalled email.
All the above-mentioned steps exclusively work on Windows operating systems, not on macOS, iPhones, or Android devices. This post has practically explained all approaches to recall an email in Outlook.
Frequently Asked Questions
How do I recall an email in Outlook 365?
To recall an email in Outlook 365, open the sent email, go to the 'Message' tab, select 'Actions', then choose 'Recall This Message'. Follow the on-screen instructions to recall the email.
Can I recall an email in Outlook if the recipient has already read it?
No, you cannot recall an email in Outlook if the recipient has already read it. The recall feature only works if the email has not been opened by the recipient.
What happens when I recall an email in Outlook?
When you recall an email in Outlook, the email is deleted from the recipient's inbox if it has not been opened. The recipient will receive a notification that you have attempted to recall the email.
Is it possible to recall an email in Outlook Web App?
Yes, you can recall an email in Outlook Web App. The process is similar to recalling an email in the desktop version of Outlook.
Can I recall an email in Outlook if I am using a different email provider?
No, you cannot recall an email in Outlook if either the sender or recipient is not using Office 365 or Microsoft Exchange account. The recall feature is limited to these accounts.
What are the common reasons for recalling an email in Outlook?
Common reasons for recalling an email in Outlook include sending the email with errors, incomplete information, forgetting attachments, or sending to the wrong recipient.
Does recalling an email in Outlook notify the recipient?
Yes, when you recall an email in Outlook, the recipient will be notified that you have attempted to recall the email. However, they will not see the content of the recalled email.
How can I check if the recall of an email in Outlook was successful?
To check if the recall of an email in Outlook was successful, go to your 'Sent Items' folder and look for a recall notification. If there is no notification, the recall was successful.