
To perform real-time operations, the OpenCV library in Python contributes a role in performing a task like image or video processing, sentiment analysis, and surveillance-related projects and gives flexible access to compute mathematical morphological operations and so on. However, to install OpenCV on systems use the “pip” package manager to handle their dependencies or install them directly on the system.
This article is about installing OpenCV using the “pip” in Python.
How to Install OpenCV Using Pip in Python?
The OpenCV package provides a handy GUI in a presentable, interpretable way to the users. However, there are two approaches to installing the package on the system either by installing it from the official URL or installing it using the “pip” commands on Windows OS.
The procedure to install OpenCV using “pip” in Python is straightforward. First, open the “Command Prompt” to execute the “pip” commands on it. Assuming that the latest version of Python and “pip” is preinstalled on your system already. However to successfully install OpenCV using the “pip” in Python, follow the below procedure:
Launch the Command Prompt
Launch the “Run” wizard from the “Win+R” keys combination, and in the “Open:” field, type “cmd” and then click on “OK” to access the Command Prompt:

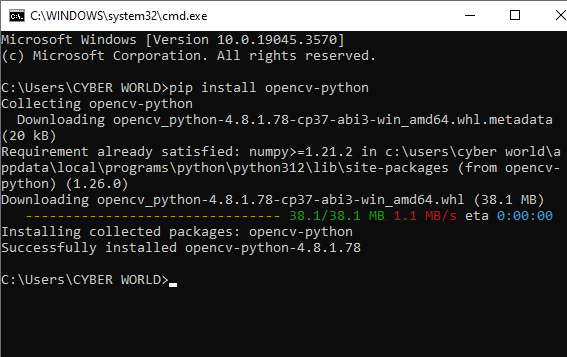
Upon launching the “cmd” Prompt, install the “OpenCV” package in the packages environment directory. Use the “pip install” package to install the latest available version of the “OpenCV”. To install the latest available package of “OpenCV”, implement the following “pip” command:
pip install opencv-pythonThe above command will start downloading the latest available version of “OpenCV” using the “pip” command:
Alternatively, utilize the below command to install the other contributing packages required for image processing and video processing projects that are not the core part of the OpenCV packages:
pip install opencv-contrib-python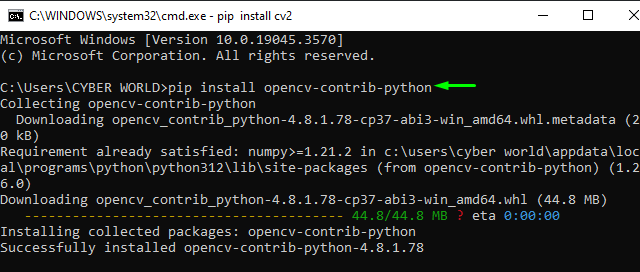
After executing the above-mentioned commands, check for the “cv2” on the Python script if it’s working fine then start using it. But if still, you are getting errors like “ModuleNotFoundError: No module named ‘cv2’”. The error occurs because the “cv2” module is not correctly installed or not interacting properly with the PATH environment.
To resolve the “No module named ‘cv2’” error, you need to install the “OpenCV” directly from the source to interact with the Windows system properly. However, download the “OpenCV” from the official site only.
After installing the “OpenCV” extract the file and follow the basic installation procedure. After successfully installing “OpenCV” from the source, follow the below-listed set of instructions to install their dependencies and packages:
Step 1: Copy the “cv2.pyd” File
first, copy the “cv2.pyd” file from the “opencv>built>python>cv2>python-3.9” path and paste it into the site-packages folder of installed Python :
opencv\build\python\cv2\python-3.9Now, paste the “cv2.pyd” file to the site-packages folder.
C:\Users\CYBER WORLD\AppData\Local\Programs\Python\Python312\Lib\site-packagesStep 2: Copy the “opencv_world480.dll” to “site-packages”
After that, copy the “opencv_world480.dll” files to the Python site-packages path. However, you can find the “opencv_world480.dll” file in the following path in your OpenCV folder:
\opencv\build\x64\vc16\bin\opencv_world480.dllAfter following those steps you have successfully installed OpenCV on your system with all their dependencies and packages. Let’s test the functionality of “cv2” on the IDE.
Test OpenCV After Successful Installation
Upon successfully installing the “OpenCV” packages, it’s time to test the package. To check the functionality of the package and its installed version, use the following commands:
The “import” command will import the “OpenCV” package into the Python script. To import the package use the “OpenCV” namespace “cv2”:
import cv2To print the version of the “OpenCV” on the kernel console use the print() function. Within the parentheses “()” invoke the “cv2” module with the “__version__” method using the “dot(.)” notation:
#consider importing cv2 module
import cv2
#printing cv2 version on kernel console
print("OpenCV version",cv2.__version__)
The above command will print the latest available version of “OpenCV” installed in your PATH environment.
Use Case: Deploy OpenCV to Change the Color of the Image
To change the color of the image “OpenCV” is beneficial. For this purpose, the “cvtColor()” function is utilized to change the hue of any image. Within the function specify the color parameter “COLOR_BGR2LAB”. In “COLOR_BGR2LAB”, “L” specifies the light hue for the “A” and “B” colors. “A” represents “greenish-magenta” and “B” represents a “Bluish-Yellow” hue:
# consider importing cv2
import cv2

# Reading an image from the path directory
load_image = cv2.imread(r'C:\Users\CYBER WORLD\Desktop\example_logo.png')

# deploying cv2.cvtColor() method with cv2.COLOR_BGR2RGB color parameter
RGB_image = cv2.cvtColor(load_image, cv2.COLOR_BGR2LAB)

# Image frame  name
cv2.imshow('Original Image', load_image)
cv2.imshow('RGB Image', RGB_image)

# open the window frames until manually closed
if cv2.waitKey(0) & 0xff == 27:
  cv2.destroyAllWindows()
That is all about installing the OpenCV using the pip in Python.
Conclusion
To install OpenCV using “pip” in Python, first, launch the “cmd” from the “Run” wizard. After that, execute the “opencv-python” command to install it using “pip” in Python. However, if still getting the “No module named ‘cv2’” error, then install “OpenCV” from the official URL, then copy the few files to the pre-installed Python “site-packages” folder. That’s it. This article has demonstrated the installation of OpenCv using “pip” in Python.
Frequently Asked Questions
How to install OpenCV using pip in Python on Windows OS?
To install OpenCV using pip in Python on Windows OS, open the Command Prompt and execute the command 'pip install opencv-python'. This will download and install the latest version of OpenCV.
What are the benefits of using OpenCV in Python for image processing projects?
OpenCV in Python provides flexible access to compute mathematical morphological operations, perform real-time image processing tasks, sentiment analysis, surveillance-related projects, and more. It also offers a handy GUI for users.
Can I install additional packages for image processing along with OpenCV using pip?
Yes, you can install other contributing packages required for image processing and video processing projects that are not part of the core OpenCV packages. Use the command 'pip install opencv-contrib-python' to install these packages.
What is the procedure to install the latest version of OpenCV using pip?
To install the latest available version of OpenCV using pip, execute the command 'pip install opencv-python'. This will download and install the most recent version of OpenCV on your system.
How can I access the Command Prompt to install OpenCV using pip?
You can access the Command Prompt by launching the 'Run' wizard using the 'Win+R' keys combination, typing 'cmd' in the 'Open:' field, and clicking 'OK'. This will open the Command Prompt to execute pip commands.
Is it necessary to have Python and pip preinstalled to install OpenCV using pip?
Yes, it is necessary to have the latest version of Python and pip preinstalled on your system to successfully install OpenCV using pip. Ensure that Python and pip are already installed before proceeding.
What are the two approaches to installing OpenCV on a system?
The two approaches to installing OpenCV on a system are installing it from the official URL or using the pip commands on Windows OS. Both methods are effective in setting up OpenCV for image and video processing tasks.
What role does the OpenCV library play in Python for real-time operations?
The OpenCV library in Python contributes significantly to real-time operations by enabling tasks like image processing, sentiment analysis, surveillance-related projects, and more. It provides access to compute mathematical morphological operations efficiently.