
Last updated:
The tracert (Trace Route) command on Windows traces the network path packets take from your PC to a destination — revealing every router hop along the way.
It works by sending ICMP packets with increasing TTL (Time To Live) values — each router along the path decrements the TTL and returns a Time Exceeded message, building the full route map. Before tracing outward, it helps to check your own settings with the ipconfig command in Windows.
Quick Answer
Open Command Prompt and run tracert google.com to trace the route to a host — the output shows each hop’s IP, hostname, and three round-trip times in milliseconds.
Understanding tracert Output
Each line in the tracert output represents one router (hop) your packet passed through on its way to the destination — the output contains five columns per hop.
| Column | What It Shows |
|---|---|
| 1st | Hop number — the router’s position in the path |
| 2nd, 3rd, 4th | Round-trip time (RTT) in milliseconds — three packets sent per hop |
| 5th | Hostname or IP address of the router at that hop |
High RTTs at a specific hop — especially sustained ones — indicate congestion or a slow link at that network segment along the route to your destination.
An asterisk (*) means no response arrived within the timeout — this is normal for routers configured to block ICMP, and does not always mean the hop is failing.
How to Use tracert on Windows
Open Command Prompt (search for cmd in the Start Menu) and use the syntax below — replace the target with any hostname or IP address you want to trace. If the output fills the window, the cls command in Windows clears the screen between runs.
tracert [-d] [-h maximum_hops] [-w timeout] [-4] [-6] target_IP_or_NameExample 1: Basic Trace Route
Run tracert followed by a hostname or IP to trace the full path — this example traces the route from your machine to google.com and lists every hop along the way.
tracert google.comExample 2: Skip Hostname Resolution (-d)
By default, tracert resolves each hop’s IP address to a hostname — use -d to skip DNS lookups and display raw IPs only, which makes the trace run significantly faster.
tracert -d google.com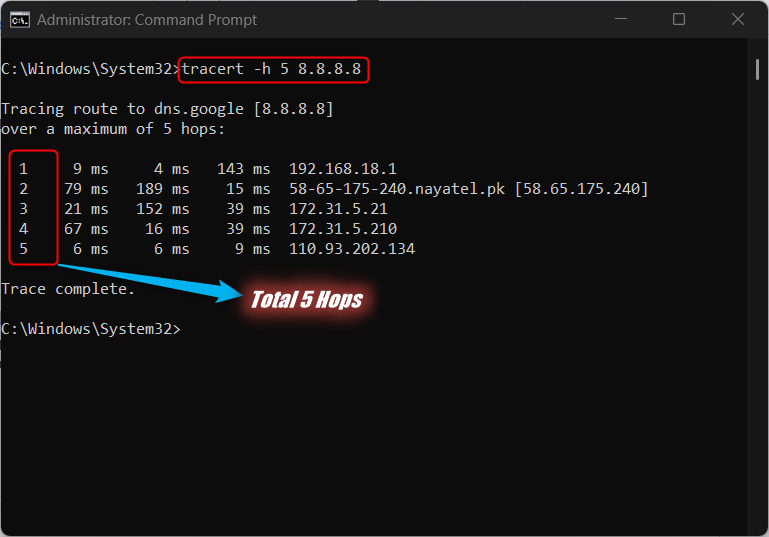
The five columns shown are: hop number, three RTT measurements in milliseconds, and the IP address of the router at each hop along the traced route.
Pro tip: If you suspect high latency is caused by slow DNS resolution rather than the network, run tracert -d to isolate the two issues separately.
Example 3: Set Maximum Hops (-h)
The default maximum hop count is 30 — use -h to override this limit when tracing paths to distant or multi-hop networks that require more than 30 routers to reach.
tracert -h 50 google.comPro tip: When tracing to a faraway network that times out before reaching the destination, increase the hop count first before adjusting any other flags.
Example 4: Set Timeout (-w)
The default timeout per hop is 4000 milliseconds (4 seconds) — use -w to increase this value when tracing paths with high latency or where slow routers cause false asterisks.
tracert -w 8000 google.comAsterisks appear when no response arrives within the timeout window — a longer timeout helps distinguish truly unresponsive hops from slow-but-working routers along the path.
Example 5: Force IPv4 or IPv6 (-4 / -6)
Use -4 to force IPv4 routing or -6 to force IPv6 — helpful when a hostname resolves to both address types and you need to trace one specific protocol’s path.
tracert -4 google.com
tracert -6 google.com
When using -6, you can also add -R to trace a round-trip path — this measures both the outbound and return route for a more complete latency picture.
Use -S srcaddr alongside -6 to force tracert to send from a specific local IP — useful on multi-homed machines with more than one network interface configured.
tracert Flags Quick Reference
| Flag | What It Does |
|---|---|
-d |
Skips hostname resolution — shows raw IPs only, faster output |
-h <n> |
Sets maximum hop count (default: 30) |
-w <ms> |
Sets timeout per hop in milliseconds (default: 4000) |
-4 |
Forces IPv4 for the trace |
-6 |
Forces IPv6 for the trace |
-R |
Traces the round-trip path (IPv6 only) |
-S srcaddr |
Sets a specific source IP address to trace from |
When to Use tracert
Use tracert when a website loads slowly or a connection times out — it identifies which specific hop along the route is introducing high latency or dropping packets entirely.
It helps distinguish between a local network problem, an ISP routing issue, and a remote server issue — the latency spike location tells you which party is responsible.
When all hops show asterisks beyond a certain point, the destination is likely blocking ICMP — use the ping command on Windows first to confirm whether the host is reachable at all.
Related Guides
These Windows command-line and system maintenance guides cover tools that pair well with tracert for diagnosing and fixing network and system issues.