

Last updated:
Fail2Ban watches your SSH logins and bans an IP address in the firewall after too many failed attempts. On Debian 13 (Trixie) and Debian 12 (Bookworm) you install it with sudo apt install fail2ban, put your own settings in a file under /etc/fail2ban/jail.d/ instead of editing jail.conf, check the result with sudo fail2ban-server -t, and restart the service. The Debian package already enables an sshd jail, so the work is mostly choosing sensible limits and making sure you cannot ban yourself.
Quick answer. Install the package, create /etc/fail2ban/jail.d/sshd-local.conf with the settings below, run sudo fail2ban-server -t, then sudo systemctl restart fail2ban and check sudo fail2ban-client status sshd. Put your own IP address in ignoreip first.
sudo apt update
sudo apt install fail2ban
[DEFAULT]
bantime = 1h
findtime = 10m
maxretry = 4
ignoreip = 127.0.0.1/8 ::1
[sshd]
enabled = trueWhat was verified and what was not. Package versions in the Debian archive (checked 7 Oct 2026): Debian 13 has fail2ban 1.1.0-8 and Debian 12 has 1.0.2-2. The screenshots in this guide were captured on Ubuntu 24.04 with fail2ban 1.0.2-3ubuntu0.1, which is built from Debian’s package, so it is close to Debian 12 but is not Debian 13 (1.1.0). I could not open the Debian 13 package contents from my test environment, so the file contents shown below are what that Ubuntu package ships; compare them with your own server using the commands in step 2. The sshd jail was not started against a real systemd journal in my test, so the live ban demo uses a sample log file and a separate demo jail. This is one step in our Debian server security checklist, which shows the order to apply them in.
The settings that matter
A jail is a rule that ties a log source, a filter (the patterns that count as a failure) and an action (the ban). Three numbers control when a ban happens: if one address fails maxretry times within findtime, it is banned for bantime.
| Setting | Default in jail.conf (tested package) | Used in this guide | Meaning |
|---|---|---|---|
bantime |
10m | 1h | How long a banned address stays blocked |
findtime |
10m | 10m | Window in which failures are counted |
maxretry |
5 | 4 | Failures allowed inside the window before a ban |
ignoreip |
not set | 127.0.0.1/8 ::1 | Addresses that are never banned; add your own admin IP or network |
Before you start
You need a user with sudo rights (see how to enable sudo on Debian if you do not have one) and a way into the server that does not depend on SSH, such as a provider console. A wrong setting or a typing mistake in your own login can get your address banned, and the console is how you undo it. Fail2Ban does not replace a firewall or key-only logins. For those, see the UFW guide for Debian 13 and 12 and the guide to hardening SSH on Debian 13 and 12.
Step 1: Install Fail2Ban
sudo apt update
sudo apt install fail2ban
sudo systemctl status fail2ban
The status output should say the service is active (running). If it is not, sudo journalctl -u fail2ban -n 30 shows why.
Step 2: See what the package already enables
Debian’s package ships a small file that turns on the SSH jail and picks the ban method and log backend. Look at it before adding anything, so you know what you are building on:
dpkg -s fail2ban | grep -E '^(Package|Version|Depends|Recommends)'
cat /etc/fail2ban/jail.d/defaults-debian.conf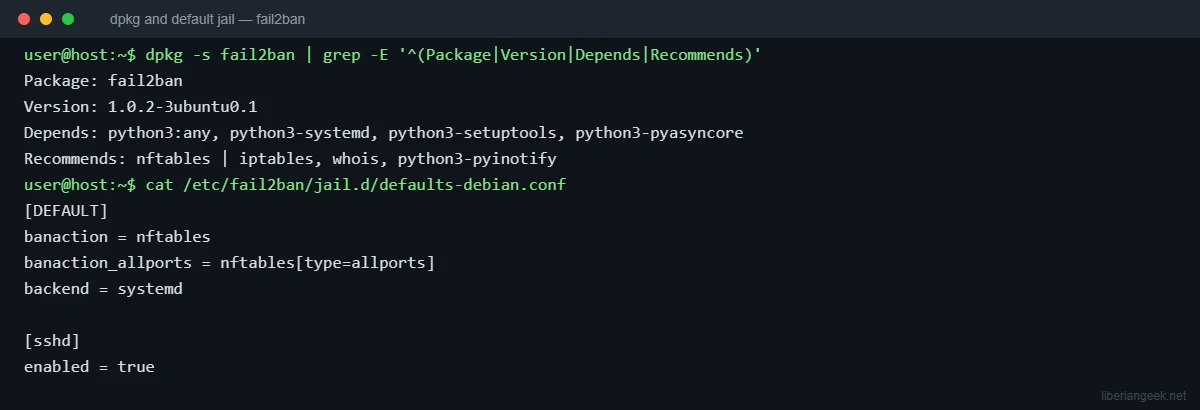
In this package the file sets backend = systemd, which means Fail2Ban reads SSH failures from the systemd journal, so it does not depend on /var/log/auth.log existing. It also sets banaction = nftables and enables [sshd]. Those two lines are why the jail works without any extra file, and why you should not copy jail.conf into jail.local wholesale.
Step 3: Add your settings in a drop-in file
Never edit /etc/fail2ban/jail.conf; package updates can replace it. Create your own file instead. Files in jail.d/ are read in alphabetical order and a later file overrides an earlier one, so a name such as sshd-local.conf comes after defaults-debian.conf and wins.
sudo nano /etc/fail2ban/jail.d/sshd-local.confPaste the settings from the quick answer. Replace the ignoreip list with your own addresses, keeping the loopback entries, for example ignoreip = 127.0.0.1/8 ::1 203.0.113.10. Use the address you connect from; if you do not know it, echo $SSH_CLIENT on the server shows it for your current session.
Step 4: Test the configuration before restarting
sudo fail2ban-server -t
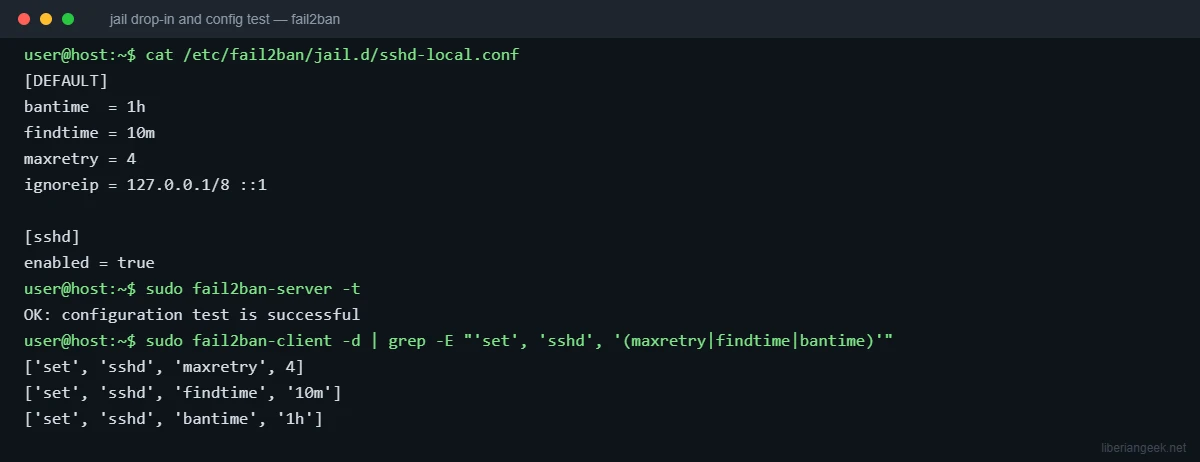
sudo fail2ban-client -d | grep -E "'set', 'sshd', '(maxretry|findtime|bantime)'"
fail2ban-server -t parses every configuration file and prints OK: configuration test is successful or the exact file and line that is wrong. The second command dumps the commands Fail2Ban would send to the running server, which shows the values that actually apply to the sshd jail after all files are merged.
The “section ‘sshd’ already exists” error
If you define [sshd] twice inside the same file, the test fails. Defining [sshd] in a different file is fine and simply overrides the earlier values. In the test below, the first run has a second [sshd] block appended to sshd-local.conf, and the second run puts maxretry = 2 in a separate file named zz-test.conf, which loads last and sets maxretry to 2.
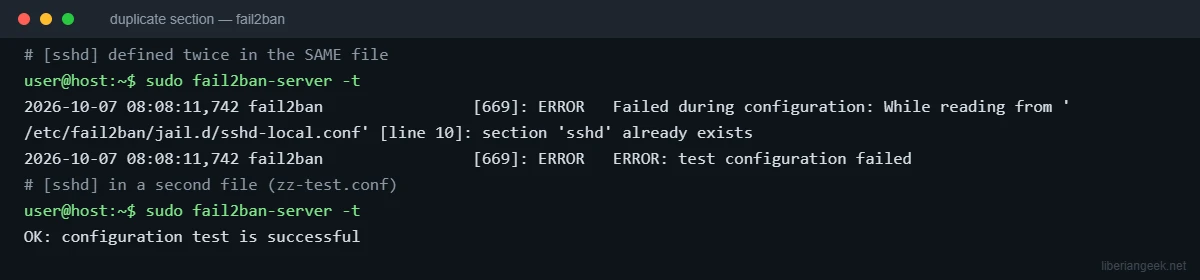
The fix is to keep one [sshd] block per file. Use grep -R "^\[sshd\]" /etc/fail2ban to find where it is defined.
Step 5: Check that the filter recognises failures
fail2ban-regex runs a filter against log lines without banning anyone. This is the safest way to confirm the patterns work. Against a real Debian system that logs to the journal, you can read the journal directly:
sudo fail2ban-regex systemd-journal sshdI did not run that exact command in my test environment, which has no systemd journal. Instead I tested the same sshd filter against a small sample file of SSH log lines (three failed passwords, one invalid user, one successful key login, all from documentation addresses):
fail2ban-regex auth.log sshd | grep -E 'Failregex|Lines:'
Four lines matched as failures and the successful key login was ignored, which is the behaviour you want. If your own run shows 0 matched for lines that are clearly failures, the log source or the date format is the problem, not the ban settings.
Step 6: Restart and check the jail
sudo systemctl restart fail2ban
sudo fail2ban-client status
sudo fail2ban-client status sshd
The first status command should list sshd under Jail list. The second shows how many failures and bans the jail has seen. Note that fail2ban-client reload re-reads the configuration without a full restart, which is handy later.
What a ban looks like
To show a ban without attacking a real server, I created a separate jail called demo-sshd that uses the same sshd filter on the sample log, with maxretry = 3 and the harmless dummy action, so no firewall rule was created. After four failures from 203.0.113.50 (a documentation-only address), the jail banned it:
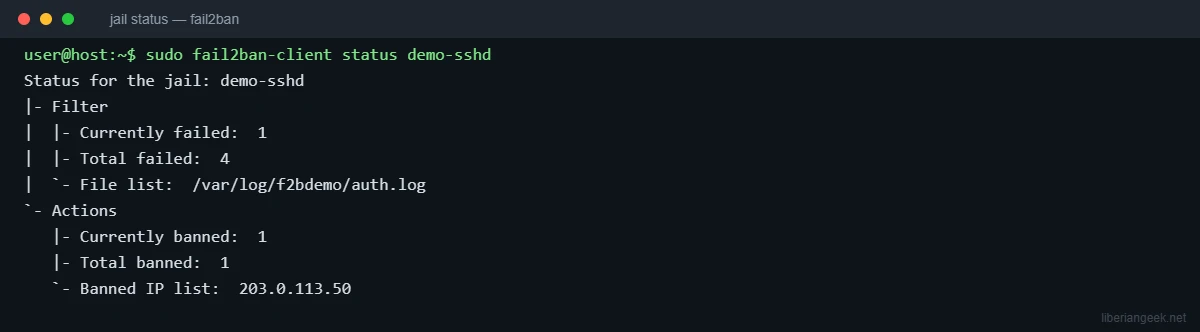
Your own server’s ban activity is also written to /var/log/fail2ban.log in the tested package (the logtarget setting in fail2ban.conf); if that file is missing on your Debian server, check sudo journalctl -u fail2ban instead.
Unban an address, or ban one by hand
If you or a colleague get banned, remove the ban from the server console:
sudo fail2ban-client set sshd unbanip 203.0.113.50
sudo fail2ban-client banned
| Task | Command |
|---|---|
| List jails | sudo fail2ban-client status |
| Show one jail | sudo fail2ban-client status sshd |
| Unban one address from a jail | sudo fail2ban-client set sshd unbanip ADDRESS |
| Unban an address in every jail | sudo fail2ban-client unban ADDRESS |
| Unban everything | sudo fail2ban-client unban --all |
| Ban an address by hand | sudo fail2ban-client set sshd banip ADDRESS |
| List all banned addresses | sudo fail2ban-client banned |
| Re-read the configuration | sudo fail2ban-client reload |
The unbanip, banip and banned commands were run in the demo above; unban ADDRESS and unban --all are listed in the fail2ban-client --help output of the tested version but were not run.
Make repeat offenders wait longer
The packaged jail.conf contains commented-out options for increasing the ban time each time an address comes back (bantime.increment, bantime.factor and bantime.maxtime). Read the comments above them in jail.conf for your version, add the ones you want to your drop-in file under [DEFAULT], then run the configuration test again. Start with a modest maxtime so that a mistake never produces a ban measured in months.
If you ban yourself
Use your provider console or physical access, log in, and run sudo fail2ban-client set sshd unbanip YOUR_ADDRESS. Then add that address to ignoreip and run sudo fail2ban-client reload. Remember that ignoreip only helps if the address is stable; a home connection that changes address is a reason to rely on keys rather than on that list.
Undo the change
sudo rm /etc/fail2ban/jail.d/sshd-local.conf
sudo fail2ban-server -t && sudo systemctl restart fail2ban
To remove Fail2Ban completely, use sudo apt remove fail2ban. In my test, a ban was still listed after restarting the service because Fail2Ban keeps bans in a database file, so run sudo fail2ban-client unban --all first if you want a clean slate.
Troubleshooting
| What you see | Likely cause | What to check |
|---|---|---|
section 'sshd' already exists and test configuration failed |
[sshd] defined twice in one file (reproduced above) |
grep -R "^\[sshd\]" /etc/fail2ban, then keep one block per file |
Failed to initialize any backend for Jail 'sshd' |
The jail’s backend cannot read its log source. I saw this in a test container that had no systemd journal while the jail used backend = systemd |
journalctl -n 5 should print SSH entries; if you changed backend or logpath, confirm the file exists |
sshd missing from fail2ban-client status |
Jail not enabled, or the service failed to load the configuration | sudo fail2ban-server -t and sudo journalctl -u fail2ban -n 30 |
| Failed logins appear in the log but nobody is banned | Address in ignoreip, failures below maxretry inside findtime, or the filter does not match |
Run fail2ban-regex (step 5) and re-check the three numbers |
A ban shows in status but the address still connects |
The firewall action is not applying, or another firewall layer allows the traffic first | Inspect the rules with sudo nft list ruleset and compare with your UFW rules; this guide did not test the firewall side |
When Fail2Ban is not the right tool
If SSH accepts only keys, password guessing already fails, so Fail2Ban mostly reduces log noise and wasted connections. It is also tied to log lines: it cannot stop attacks that are not logged, and it cannot protect a service you have not made a jail for. Treat it as one layer on top of key-only logins and a firewall, not as the main defence.
FAQ
Do I need jail.local on Debian?
No. A file in /etc/fail2ban/jail.d/ is read after jail.conf and overrides it, which is the method used and tested here. jail.local is also a common choice, but it was not tested in this guide.
How long does a ban last?
Until bantime runs out: 10 minutes by default in the tested jail.conf, 1 hour with the settings in this guide.
Does Fail2Ban protect services other than SSH?
Yes, through other jails such as web server and mail jails, each of which needs its own enabled section and a working log source. Add them one at a time and test each with fail2ban-regex.